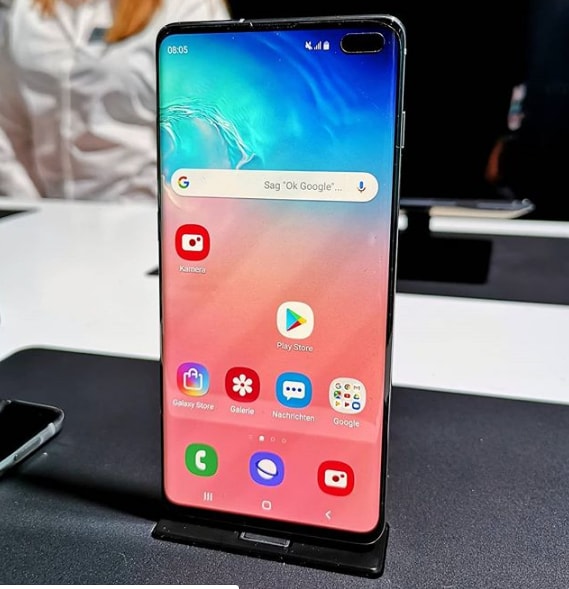
The Samsung Galaxy S10 is a line of Android smartphones manufactured and developed by Samsung Electronics. It was Unveiled during a press event on February 20, 2019, they are scheduled to be begin shipping on March 8, 2019. The Samsung Galaxy S10 release date will be on Friday, March 8, which is one week earlier than last year’s samsung galaxy phone. It was officially announced on February 20.
The Galaxy S10 prices are $899 / £799 / AU$1,349 / AED 3,199, meaning you’re going to be spending an additional $180 / £60 / AED 100 on this smartphone over the S9 launch price. If you like the look of this smartphone but think that price is a tad high, you have two options: you can go for the cheaper Samsung Galaxy S10e, which starts at $749 / £669 / AU$1,199 / AED 2,699.
Differentiated primarily by screen size and an additional front camera on the S10+. In addition, Samsung also unveiled a smaller model known as the Galaxy S10e, as well as a larger, 5G-compatible version, the Galaxy S10 5G. The Samsung Galaxy S10 comprises of four models with various hardware specifications; the main Galaxy S10 and Galaxy S10+ respectively has a 6.1 and 6.4-inch 1440p “Dynamic AMOLED” displays with HDR10+ support and “dynamic tone mapping” technology.
The Smartphone displays have curved sides that slope over the horizontal edges of the smartphone device. Unlike its predecessors, their front cameras occupy a rounded cut-out near the top-right of the display, and both models utilize an ultrasonic in-screen fingerprint reader. International models of the S10 utilize the Exynos 9820 system-on-chip, while American models utilize the Qualcomm Snapdragon 855. The two devices are sold with either 128 or 512 GB of internal flash memory storage.
The Samsung Galaxy S10 features a multi-lens rear-facing camera setup; it still has the dual-aperture 12-megapixel and 12-megapixel telephoto lenses of the previous Samsung Galaxy S9+, but also adds a 16-megapixel ultra-wide-angle lens. The front camera on the Galaxy S10+ is accompanied by a second RGB depth sensor. The cameras also support 4K video recording and HDR10+.
How To Use Dolby Atmos Samsung Galaxy S10 / S10+ / S10e:
Turn On Dolby Atmos:
Whether you’re watching a zombie movie or listening to some slow jams, Dolby Atmos will give you a superior listening experience.
Using two fingers, swipe down from the top of the screen to open the Quick Settings panel. Swipe to and touch Dolby Atmos to turn it on or off.
To access more advanced settings for Dolby Atmos, touch and hold the icon. Then, select your desired setting for the type of entertainment you’re enjoying.
The following settings are available:
Auto: Optimize sound automatically for whatever you’re listening to. The audio will adjust so you get the perfect sound.
Movie: Deliver the best possible audio for videos, shows, and movies, so you’ll feel completely immersed.
Music: Make all your music sound richer, fuller, and more balanced.
Voice: Makes voices loud and clear, so they don’t get drowned out by background noise.
Dolby Atmos for Gaming:
Dolby Atmos already makes mobile games sound amazing, but with Galaxy S10, games will be even more lifelike. Dolby Atmos for gaming will amplify even the lowest sounds, like footsteps in a horror game.
On top of this, Samsung has partnered with certain games, like the brand new Harry Potter: Wizards Unite and Gears POP! games, to bring fans the best experience.
To turn on this feature, from Settings, search for and select Sound quality and effects.
Then, touch the slider next to Dolby Atmos for gaming.
Equalizer Settings:
If you love a song, but something sounds funny, you can adjust the Equalizer settings to fix it. You can also adjust other audio settings to make the song sound even better.
From Settings, search for and select Sound quality and effects. Touch Sound quality and effects again, and then touch Equalizer to choose your desired settings. You can choose Normal, Pop, Classic, Jazz, Rock, or Custom. Each of those options automatically adjusts the bass, treble, instruments, and vocal settings to fit the music you are listening to.
You can also adjust the settings manually, so they match your personal preferences. For example, maybe you love to feel that low bass when you’re listening to your favorite genre of music.
Under Equalizer, use your finger to move the scroller around the circle and adjust the amount of Bass or Treble. You can also adjust the Instrument and Vocal settings for songs using the same steps.
To see more advanced Equalizer settings, touch Advanced. Use your finger to move the scroller bars up or down and adjust the different audio settings.
Note: To return to the basic Equalizer settings, touch Basic.
UHQ Upscaler:
This option is only available when your headphones are plugged in.
Your phone’s audio can sound even better with wired headphones when you use the UHQ upscaler features. If you’re wondering, UHQ stands for Ultra High Quality.
From Settings, search for and select Sound quality and effects. Touch Sound quality and effects again, and then touch UHQ upscaler. In audio, a “bit” is how much information is in a sample. Bit upscaling can help all that info – or the audio – sound clearer. You can choose between the two following settings:
Bit upscaling: The default setting when you plug in headphones.
Bit and bandwidth upscaling: A more advanced upscaling option that will make the sound quality higher.
You can also adjust even more settings. Touch the slider next to Tube Amp Pro to simulate the soft timbre of a tube amplifier. Or, touch the slider next to Concert hall to stimulate the reverb of a concert hall.
Note: Tube Amp Pro and Concert Hall are not available on Galaxy S10.
Sound Personalization:
We all hear sound differently. With Sound Personalization, you can choose the type of sound that works best for you.
From Settings, search for and select Sound quality and effects. Touch Sound quality and effects again, and then, swipe to and touch Adapt Sound. Choose your age group. To hear a preview of the different options, touch the gear icon and then follow the on-screen instructions.
You can also create a sound profile based on your own hearing ability. Touch Add personalized sound profile, and then touch Start. Follow the on-screen instructions to take a hearing test and create your very own sound profile.
Experiencing difficulties with your Android Device, check out our “How To” page on how to resolve some of these issues.
Other Android Technical Reviews:- Android


Why did they omit the Tube Amp Pro from the Galaxy S10 series?
Hmmm. Looks like Samsung might just lose a customer. This is absolutely my favorite setting as it makes my music sound…well…more real.
I’m getting so sick and tired of this shit where they decide to just omit something that has been available in several generations of devices. I guess to streamline everything and make everything consistent? Uh, well, then I guess I’ll buy any damned smartphone, say old chap it doesn’t have to be a Samsung, does it? Surely not now. They just removed my favorite feature. Why? I don’t know, and honestly I don’t care.