
Many Windows 10 users reported that their Wi-Fi keeps disconnecting an then reconnecting. Well if you are also facing the same issue don’t worry as it is very common problems among the Windows 10 users which can be fixed quite easily. This is surely an annoying thing especially when you are playing games or watching an online video. So here are a few methods you can try to fix this Wi-Fi issue on your Windows 10 pc.
But before to the methods, it is important to review your network and router. They might be the one who is causing all the problems which you are blaming on your laptop. Check your routers cables and power supply. Once you are sure they are working properly, then you can move to the steps.
Fixes for Wi-Fi problem on Windows 10
Method 1
Changing the power management settings
The first thing that you should do is change the power management of your PC. Here is how you can do it.
- Right click on the Wi-Fi icon which is present in the bottom right corner of the desktop.
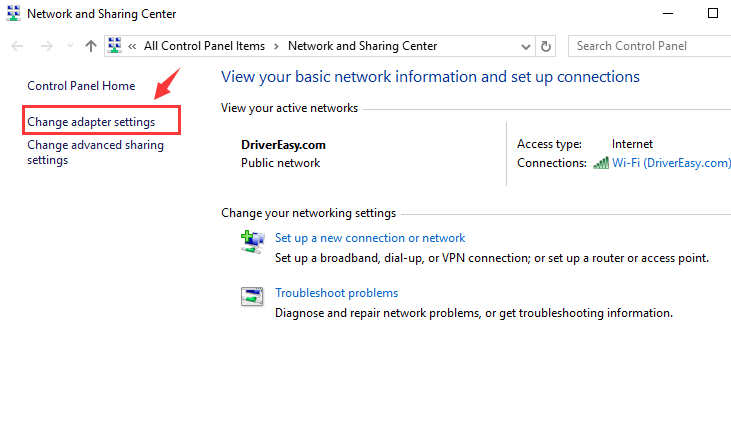
- Now click on Open network and sharing center.
- Network and sharing dialog box will appear. Here click on Change adapter settings.
- Now right click on the Wi-Fi adapter and then select properties from the menu.
- Click on the configure button.
- Move to the power management tab.
- Now uncheck the “Allow computer to turn off this device to save power” option.
- Click on Ok button.
Done.
This might solve the issues go ahead and check for the problem. If it’s there move to the second method.
Method 2
Restarting the Wi-Fi auto configure
The Wi-Fi problem may also be happening because of bad Wi-Fi configuration. So here is how you can make it right.
Press the Windows button and R key both at the same time. This will open the Run application.
Now type services.msc and then click on ok.
This will open a new window.
Search for WLAN AutoConfig from the list and double click on it.
You will see a new dialog box specific to that option. Here change the startup type to Automatic.
Now click on Apply and then Ok button.
Check your Wi-Fi connection to see if it is working normally.
Method 3
Updating the network driver
The next thing you can try is updating the network adapter driver. This can be done either manually or automatically. We will cover both the ways of updating the driver.
Manual Update
The manual update requires you to do everything yourself. First, you need to visit the manufacturer’s website and then search for the latest driver for your adapter. Now you need to install it. Make sure you only download those drivers which are compatible with the version of the operating system you are using.
Automatic update
If you find the manual updating hard and time consuming you can leave it to Driver Easy. Driver Easy is a great application which keeps all your computer’s drivers updated. It automatically searches and then downloads the latest version of drivers which are compatible with your PC.
For this, you need to download and install Driver Easy software.
Go to Google and search for Driver Easy.
Download and install the software from a safe site.
Now open the Application and click on the Scan button.
This will start scanning for the outdated driver.
Click on the update option next to wireless card device.
This will download the latest version of the driver.
You can now install it manually.
Or you can purchase the professional version of Driver Easy which even installs the drivers automatically. This makes your task very easy as all the drivers will be updated as soon as a new version is made available.
So these are a few methods using which you can solve the Wi-Fi problem on Windows 10. One of the above-listed methods will definitely solve your issues.


