The ‘Audio Service Not Responding’ error can be a frustrating issue for Windows 10 and 11 users, as it disrupts sound functionality and impacts tasks such as audio playback and video conferencing. Fortunately, there are effective solutions available to diagnose and resolve this error, ensuring a seamless audio experience on your Windows operating system. In this comprehensive guide, we will explore the steps to address and fix the ‘Audio Service Not Responding’ error in Windows 10 and 11, allowing you to regain control over your system’s audio functions.
What Is the Audio Services Not Responding on Windows 10/11 Error?
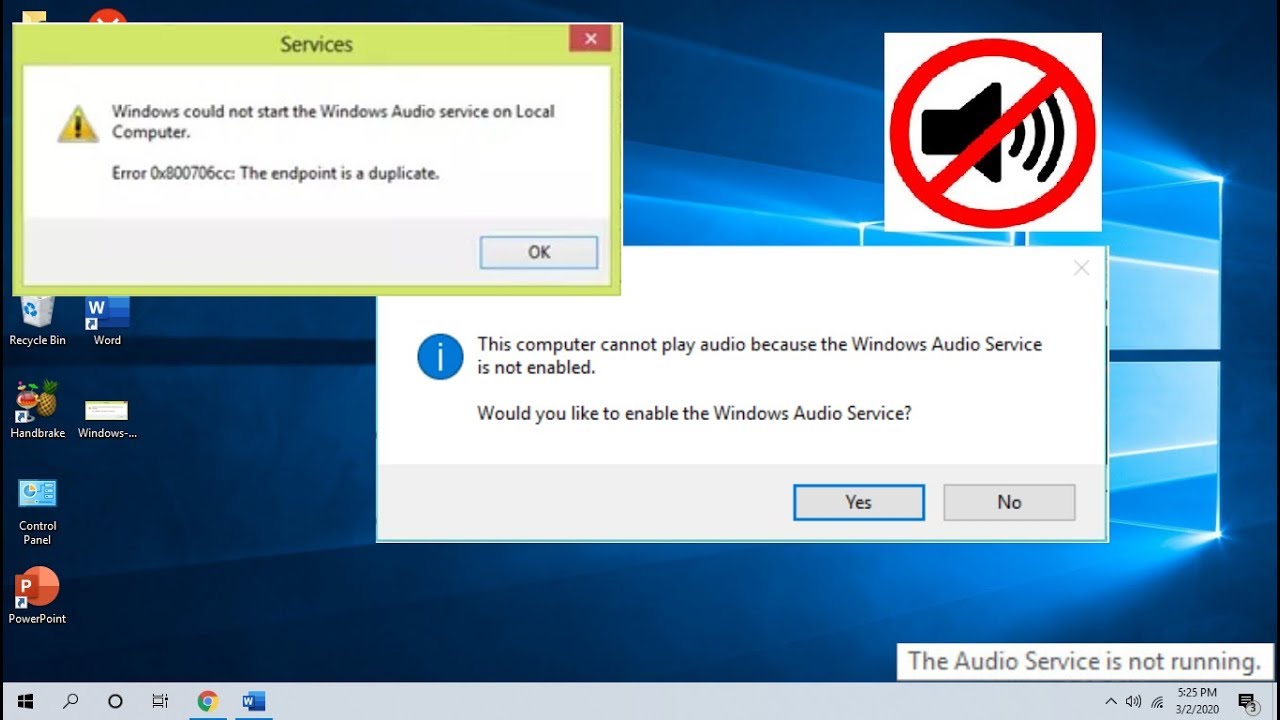
The “Audio Services Not Responding” error on Windows 10 and 11 occurs when the audio services responsible for managing sound on your computer stop working properly. This can result in issues such as no sound coming from speakers or headphones, audio playback problems, and disruptions during video calls or media playback. The error message indicates that the system’s audio services are not functioning as expected, which can be caused by various factors including driver conflicts, software glitches, or incorrect settings.
To resolve this error, it is important to troubleshoot and identify the root cause of the problem. By following the steps outlined in this guide, you will be able to implement the necessary fixes and restore normal audio functionality on your Windows 10 or 11 system.
How to Fix Audio Services Not Responding on Windows 10?
Before diving into the more complex fixes, let’s start with some simple troubleshooting steps.
Before You Proceed
First, try restarting your PC and checking if the audio service problem persists. Sometimes, the error might occur due to a temporary glitch or an incomplete system restart.
Consider booting Windows 10 into safe mode to confirm that the audio issue isn’t caused by third-party applications. If it turns out to be related to such apps, you can uninstall them.
Interestingly, a surprisingly simple solution to this error is adjusting the volume. To adjust your computer’s volume settings, click on the speaker icon in the taskbar and drag the volume slider to increase or decrease the volume.
Now, let’s move on to more specific methods to fix the ‘Audio Service Not Responding’ error in Windows 10.
Method 1: Run Audio Troubleshooter
One of the easiest ways to address common audio problems is by using the built-in troubleshooting tools provided by Windows. The audio troubleshooter scans your computer to ensure that all the related settings are correctly configured and performs specific troubleshooting steps to resolve the issue.
To run the audio troubleshooter:
- Press the Windows key, type “Control Panel,” and select “Open” from the results.
- Change the “View by” setting to “Large icons” and click on the “Troubleshooting” option.
- Choose the “View All” option on the left side of the window.
- Locate and click on the “Playing Audio” troubleshooter to identify and address sound-related issues.
- Click on the “Advanced” option within the Playing Audio troubleshooter.
- Enable the “Apply repairs automatically” option and click “Next.”
- The troubleshooter will begin detecting problems.
- Follow the on-screen instructions to resolve the issue.
Method 2: Start Audio Services Manually
If the audio service is not running, you can manually start it to resolve the ‘Audio Service Not Responding’ error in Windows 10.
To do this:
- Press the Windows key and R key together to open the Run dialog box.
- Type “services.msc” and click OK to launch the Services Manager.
- Locate the “Windows Audio” service and in the left pane, click on “Restart the service.”
- Right-click on the “Windows Audio” service and select “Properties.”
- In the General tab, select “Automatic” from the dropdown menu under “Startup type.”
- If the Service status shows “Stopped,” click the “Start” button to change the status to “Running.” If the status is already “Running,” proceed to the next step.
- Click “Apply” to save the changes and then select “OK” to exit.
Method 3: Modify Log On Settings of Services
Sometimes, the error can be caused by incorrect settings of the local account. To address this, you can modify the log-on settings of services.
Here’s how:
- Open the Windows Services application and follow the directions given in Steps 1 to 5 of Method 2.
- Click on the Name column header to sort the Services alphabetically.
- Right-click the Windows Audio service and go to Properties.
- Within this window, navigate to the “Log On” tab.
- Enable the “Local System account” option and click “Apply” to apply the modifications.
- Check whether the error “Audio Service is not running Windows 10” still persists. If it does:
- On the “Log On” tab, select “This account:” and enter “Local Service” in the adjacent text box.
- Complete the Password and Confirm password fields.
- Press “Apply” and then “OK” to confirm the changes.
Method 4: Fix Local Account Configurations
Incorrect configurations of the local account can also trigger the ‘Audio Service Not Responding’ error. You can fix this by running specific commands using Command Prompt:
- Press the Windows key, type “Command Prompt,” and select “Run as administrator.”
- Enter the following commands one by one and press Enter. Check if this resolves the issue.
net localgroup Administrators /add networkservice

net localgroup Administrators /add localservice

SC config Audiosrv start= auto

REG ADD "HKLM\SYSTEM\CurrentControlSet\Services\Audiosrv" /V start /T REG_DWORD /D 2 /F

secedit /configure /cfg %windir%\inf\defltbase.inf /db defltbase.sdb /verbose
Method 5: Modify Registry Settings
An improperly set Windows Registry entry can also trigger the ‘Audio Service Not Responding’ error. However, editing the registry requires caution as any mistakes can lead to more problems.
To modify the registry settings:
- Press the Windows key and the R key together to open the Run dialog box.
- Type “regedit” and press Enter to launch the Registry Editor application.
- Go to
HKEY_Local_Machine\System\CurrentControlSet\Services\AudioEndPointBuilder\Parameter. - Ensure that the “Data” column of “ServiceDll” reads
%SystemRoot%\System32\AudioEndPointBuilder.dll. - If it doesn’t match, right-click on “ServiceDll” and select “Modify.”
- Enter
%SystemRoot%\System32\AudioEndPointBuilder.dlland click OK. - Restart your PC.
Method 6: Update Audio Drivers
Outdated or incompatible audio drivers can cause the ‘Audio Service Not Responding’ error. By updating your audio drivers, you can potentially resolve this issue.
To update your audio drivers:
- Press the Windows key and type “Device Manager.”
- Open the Device Manager and expand the “Sound, video, and game controllers” category.
- Right-click on your audio device and select “Update driver.”
- Choose the option to search automatically for updated driver software.
- Follow the on-screen instructions to complete the driver update process.
Conclusion
By following the methods outlined in this guide, you can effectively address and fix the ‘Audio Service Not Responding’ error in Windows 10 and 11. Whether it’s running the audio troubleshooter, starting audio services manually, modifying log-on settings, adjusting registry entries, or updating audio drivers, these steps will help restore normal audio functionality on your Windows system. Remember to proceed with caution when making changes to your system, and if necessary, seek professional assistance. With these solutions, you can enjoy a seamless audio experience on your Windows device once again.
FAQ
Why Did My Audio Suddenly Stop Working on Windows 10?
There can be various reasons for sudden audio issues on Windows 10, including driver conflicts, software glitches, incorrect settings, hardware problems, or updates that affect audio functionality. By following the troubleshooting methods outlined in this guide, you can identify and resolve the underlying cause of the audio problem.
How Do I Update My Audio Drivers on Windows 11?
To update your audio drivers on Windows 11, you can follow similar steps as outlined in Method 6 of this guide. Open the Device Manager, expand the “Sound, video, and game controllers” category, right-click on your audio device, and select “Update driver.” Choose the option to search automatically for updated driver software, and follow the on-screen instructions to complete the driver update process.
Can Malware Affect My Computer’s Audio Functions?
Yes, malware can potentially affect your computer’s audio functions. Malicious software can interfere with system processes, including those related to audio services. It is important to keep your computer protected with up-to-date antivirus software and perform regular scans to detect and remove any malware that may be affecting your system.
Experiencing difficulties with your Device, check out our “How To” page on how to resolve some of these issues.