If you’re experiencing issues with your iPhone and considering the Apple Self Service Repair program, it’s important to put your device in diagnostics mode before starting the repair process. Diagnostic mode allows Apple to identify potential hardware and software issues with your iPhone, helping you to troubleshoot and resolve problems effectively. In this comprehensive guide, we’ll walk you through the steps to put your iPhone in diagnostics mode, ensuring a smooth self-repair experience.
What is Apple Self Service Repair?
The Apple Self Service Repair program is part of Apple’s initiative to expand access to repairs and empower users to fix their own devices. Under this program, Apple provides repair manuals, parts, and tools for various components of the iPhone, including the display, battery, bottom speaker, camera, and SIM tray. This program also offers tool rental kits for customers who prefer not to purchase tools for a single repair.
To begin the Self Service Repair process, you’ll need to review the repair manual for your specific iPhone model on Apple’s support page. Once you’re familiar with the repair process, you can order the necessary parts and tools from the Apple Self Service Repair Store.
Why Put Your iPhone in Diagnostics Mode?
Before starting the Self Service Repair program, Apple may ask you to put your iPhone in diagnostics mode as part of the System Configuration process. Diagnostic mode allows Apple to identify any potential hardware or software issues with your device, ensuring that you receive accurate repair instructions and recommendations. By putting your iPhone in diagnostics mode, you’ll be able to provide Apple with valuable information that can assist in the repair process.
How to Put Your iPhone in Diagnostics Mode
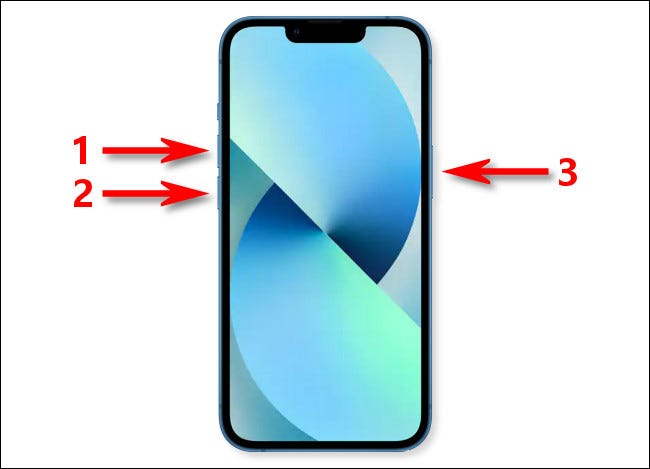
To put your iPhone in diagnostics mode, follow these simple steps:
- Turn off your iPhone: Press and hold either the volume button and the side button simultaneously until the power-off slider appears on the screen.
- Power off your iPhone: Drag the power-off slider and wait for your device to turn off completely.
- Enter diagnostics mode: Press and hold both the volume up and volume down buttons simultaneously.
- Connect your iPhone: While still holding the volume buttons, connect your iPhone to a power source using either your power adapter or computer.
- Wait for the Apple logo: Continue holding the volume buttons until you see the Apple logo on your iPhone’s screen.
- Start diagnostics: Once the Apple logo appears, release the volume buttons. A message will appear on the screen, stating “Diagnostics allow Apple to identify potential hardware and software issues with this device.” Tap Start Diagnostics to begin the diagnostics process.
Congratulations! Your iPhone is now in diagnostics mode, and you’re ready to proceed with the Self Service Repair program.
Tips for a Successful Self Service Repair Experience
While the Self Service Repair program provides you with the necessary resources to fix your iPhone, it’s important to keep a few tips in mind for a successful repair experience:
Read the repair manual carefully: Before attempting any repairs, thoroughly review the repair manual for your specific iPhone model. Pay close attention to the instructions and ensure you have a clear understanding of each step.
Gather the necessary tools: Make sure you have all the required tools before you begin the repair process. If you don’t want to invest in tools for a single repair, consider renting the tool kit from Apple.
Create a clean and organized workspace: Find a clean and well-lit area to perform the repairs. Use a soft, static-free surface to prevent damage to your iPhone and keep all the components organized.
Take your time: Repairing your iPhone requires patience and attention to detail. Take your time to ensure each step is performed correctly, and don’t rush the process.
Follow safety precautions: Always prioritize your safety when performing repairs. Disconnect your iPhone from any power sources, wear anti-static gloves if necessary, and exercise caution when handling small components.
Reach out for support: If you encounter any difficulties during the repair process, don’t hesitate to seek support. Apple’s support page and forums are great resources for troubleshooting and guidance.
By following these tips, you’ll increase your chances of successfully repairing your iPhone using the Self Service Repair program.
Conclusion
Putting your iPhone in diagnostics mode is a crucial step before starting the Apple Self Service Repair program. By following the steps outlined in this guide, you’ll be able to provide Apple with valuable information about your device’s hardware and software, ensuring an accurate and effective repair process. Remember to read the repair manual carefully, gather the necessary tools, create a clean workspace, take your time, prioritize safety, and seek support when needed.
Experiencing difficulties with your Device, check out our “How To” page on how to resolve some of these issues.