Windows 11, the latest operating system from Microsoft, brings a range of new features to enhance your productivity and organization. One of the standout features is the ability to create and manage multiple desktops. This feature allows you to have separate workspaces for different tasks, helping you stay focused and organized. In this guide, we’ll walk you through the process of setting up multiple desktops in Windows 11 and show you how to make the most of this powerful feature.
Why Use Multiple Desktops in Windows 11?
Before we dive into the details of setting up multiple desktops, let’s explore why you might want to use this feature in the first place. Here are some of the key benefits:
- Improved Organization: With multiple desktops, you can separate different projects, tasks, or types of applications into their own dedicated workspaces. This helps reduce clutter and makes it easier to focus on specific activities.
- Enhanced Productivity: By having separate desktops for different projects or tasks, you can switch between them quickly and efficiently. This eliminates the need to constantly minimize and maximize windows, allowing you to stay focused and work more efficiently.
- Work-Life Balance: With multiple desktops, you can create a dedicated workspace for work-related tasks and another for personal activities. This helps maintain a clear separation between work and leisure, promoting a healthier work-life balance.
Now that you understand the benefits of using multiple desktops, let’s jump into the steps to set them up in Windows 11.
Step 1: Accessing Task View
To get started, you’ll need to access Task View, which is where you can manage and switch between your virtual desktops. There are a few ways to access Task View:
- Click on the Task View button: By default, the Task View button is located on the taskbar, next to the Start button. It looks like a rectangle with two smaller rectangles stacked on top of it. Simply click on this button to open Task View.
- Use the Win+Tab keyboard shortcut: Pressing the Win key and the Tab key together will also open Task View.
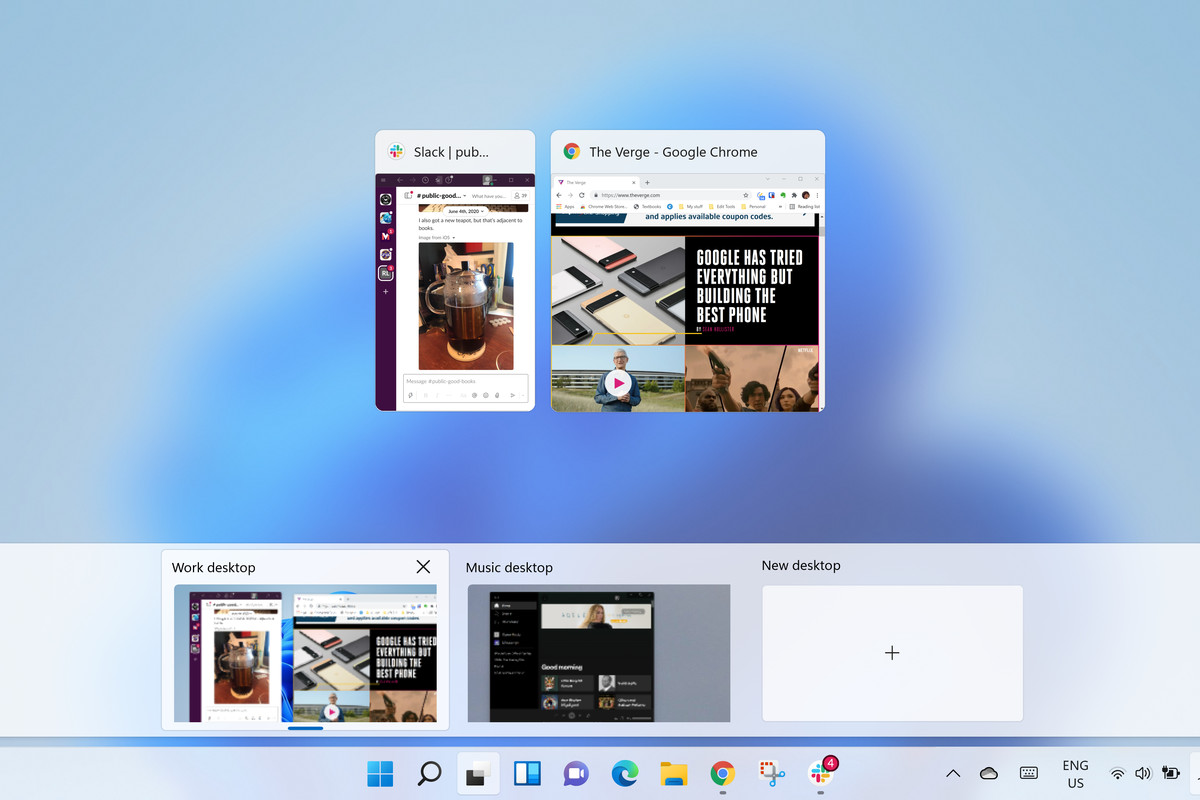
Once you have Task View open, you’ll see an overview of your virtual desktops at the bottom of the screen, along with any open apps on each desktop.
Step 2: Creating a New Desktop
To create a new desktop, follow these steps:
- Click on the New Desktop button: In Task View, you’ll see a button labeled “New Desktop” at the top-left corner of the screen. Click on this button to create a new virtual desktop.
- Use the Win+Ctrl+D keyboard shortcut: Alternatively, you can use the keyboard shortcut Win key, Ctrl key, and D key together to create a new desktop.
Once you’ve created a new desktop, you’ll see it appear in the Task View overview, along with your existing desktop(s).
Step 3: Switching Between Desktops
Now that you have multiple desktops set up, you can easily switch between them. Here’s how:
- Click on the desktop thumbnail: In Task View, you’ll see thumbnails of each desktop. Click on the thumbnail of the desktop you want to switch to, and that desktop will become active.
- Use the Win+Ctrl+Left Arrow or Win+Ctrl+Right Arrow keyboard shortcuts: Pressing the Win key, Ctrl key, and the Left or Right Arrow key together will allow you to navigate between your desktops.
Step 4: Moving Apps Between Desktops
To move apps between desktops, follow these steps:
- Click and drag the app: In Task View, click and drag the app you want to move to a different desktop. As you drag the app, you’ll see a preview of the desktops. Drop the app onto the thumbnail of the desired desktop to move it.
- Right-click on the app: Alternatively, you can right-click on the app in the Task View overview and select “Move to” to choose the desktop where you want to move the app.
Step 5: Renaming a Desktop
If you want to give your desktops more descriptive names, you can easily rename them. Here’s how:
- Click on the desktop name: In Task View, click on the name of the desktop you want to rename.
- Type in the new name: Once you’ve clicked on the desktop name, you can start typing to enter a new name for the desktop. Press Enter to save the new name.
Step 6: Changing Desktop Backgrounds
Each virtual desktop can have its own background wallpaper, allowing you to differentiate them visually. Here’s how to change the background for a specific desktop:
- Right-click on the desktop thumbnail: In Task View, right-click on the thumbnail of the desktop you want to change the background for.
- Select “Choose background”: From the context menu, select “Choose background” to open the personalization settings.
- Choose a background: In the personalization settings, you can select a background image from the preset options or browse your computer for a custom image. Once you’ve chosen a background, it will be applied to the selected desktop.
Repeat these steps for each desktop to customize their backgrounds individually.
Step 7: Using the Same App on Different Desktops
In some cases, you may want to have the same app open on multiple desktops. Here’s how to do it:
- Right-click on the app: In Task View, right-click on the app you want to use on multiple desktops.
- Choose the desired option: From the context menu, select either “Show this window on all desktops” or “Show windows from this app on all desktops.” The first option will only show a single window of the app on all desktops, while the second option will show all windows of the app on all desktops.
By using these options, you can have the same app open on multiple desktops and work with them independently or collectively.
Virtual Desktops 101
Now that you know how to set up and manage multiple desktops in Windows 11, let’s delve into some additional details about virtual desktops:
Benefits of Virtual Desktops
Virtual desktops offer several benefits, including:
- Task Separation: Virtual desktops allow you to separate different tasks, projects, or types of applications, keeping them organized and reducing distractions.
- Efficient Multitasking: With multiple desktops, you can work on different projects or tasks simultaneously without cluttering your workspace.
- Easy Navigation: Switching between desktops is quick and straightforward, helping you stay focused on specific activities.
Frequently Asked Questions
Here are some commonly asked questions about virtual desktops in Windows 11:
- Can I disable multiple desktops in Windows 11? No, the virtual desktops feature cannot be disabled, but you can hide the Task View button from the taskbar if you prefer.
- How do I split my desktop in Windows 11? To split the screen in Windows 11, hover over a window’s maximize button to bring up the Snap Layout options and choose the desired layout.
- How do I use multiple monitors on Windows 11? Connect your additional monitor, then go to Settings > System > Display > Multiple Displays > Detect to set up and configure multiple monitors.
Conclusion
Setting up and using multiple desktops in Windows 11 can greatly enhance your productivity and organization. By following the steps outlined in this guide, you can create separate workspaces, switch between them effortlessly, and optimize your workflow. Take advantage of this powerful feature to stay focused, organized, and in control of your tasks. Happy multitasking!
Remember, Windows 11 offers a range of features and functionalities that can make your computing experience even better. Explore the settings, customization options, and other tools available to tailor Windows 11 to your specific needs and preferences.
Experiencing difficulties with your Device, check out our “How To” page on how to resolve some of these issues.