In today’s interconnected world, smart home devices have become increasingly popular. Among them, smart lights offer a convenient and energy-efficient way to illuminate your home. With the integration of Amazon’s virtual assistant, Alexa, controlling your smart lights has become even easier. In this comprehensive guide, we will walk you through the process of setting up and controlling smart lights with Alexa, providing you with step-by-step instructions and valuable tips along the way.
Smart lights offer a range of benefits, from energy efficiency to customizable lighting options. By integrating Alexa, Amazon’s virtual assistant, you can control your smart lights using simple voice commands. Whether you want to turn on a single light or create a lighting ambiance in an entire room, Alexa makes it possible with just a few words. In this guide, we will provide you with all the information you need to set up and control your smart lights with Alexa.
What You Need to Control Lights with Alexa
Before we dive into the setup process, let’s take a look at the essential components you’ll need to control your lights with Alexa:
- Smart Plug: A smart plug allows you to control any light that plugs into a standard outlet.
- Smart Light Bulb: A smart light bulb replaces your traditional light bulb and can be controlled wirelessly.
- Smart Wall Switch: A smart wall switch replaces your existing light switch and enables remote control of your lights.
- Device with Alexa Built-in or Alexa App: You’ll need an Amazon Echo device or a smartphone/tablet with the Alexa app installed.
Make sure to check the compatibility of your chosen smart lights with Alexa before making a purchase. Once you have the necessary hardware, you’re ready to connect your smart lights to Alexa.
Connecting Smart Lights to Alexa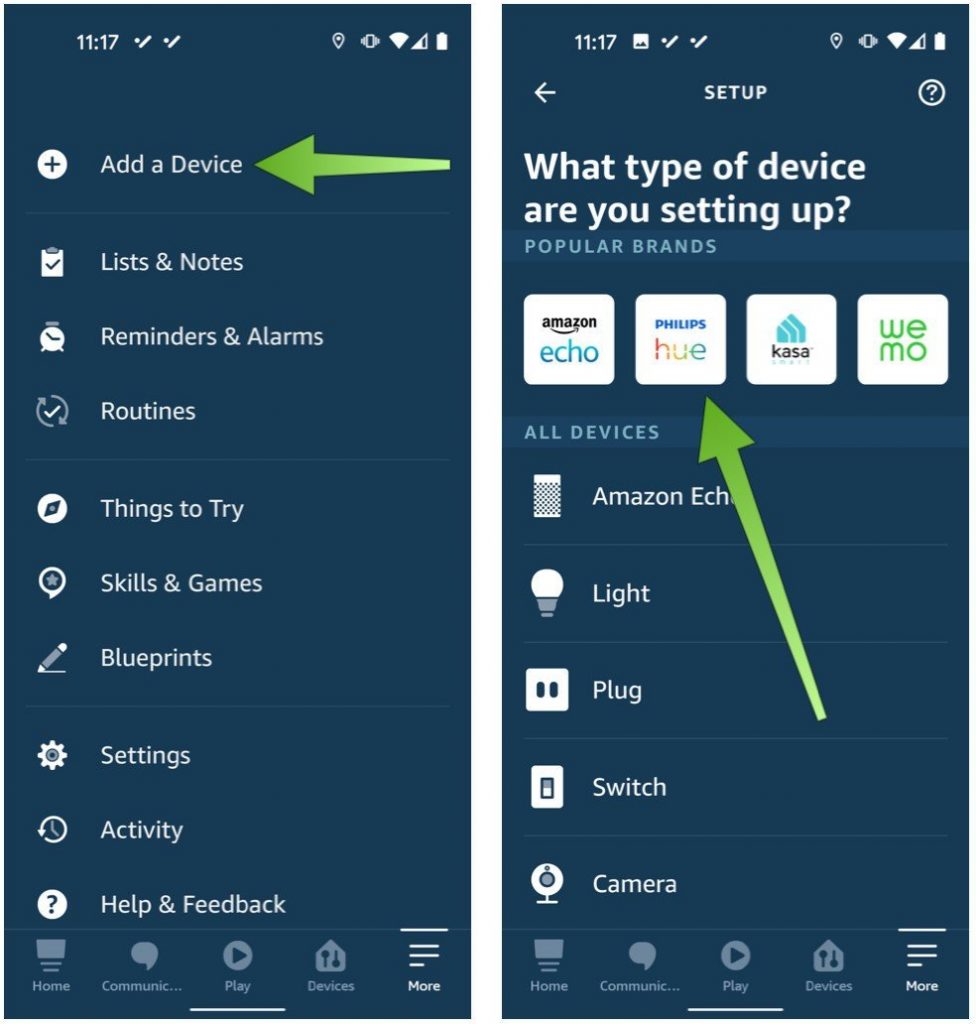
To connect your smart lights to Alexa, follow these steps:
- Open the Alexa app on your smartphone or tablet.
- Tap on the “Devices” tab at the bottom of the screen.
- Tap on “All Devices” to start the device discovery process.
- Alexa will search for any compatible devices nearby. Wait for the search to complete.
- Once your smart lights are detected, they will appear in the list. Tap on the name of the light you want to connect.
- Follow the on-screen instructions to complete the setup process for your specific smart light brand.
Remember to link your smart light account (such as Philips Hue or TP-Link) to your Amazon account during the setup process. This will allow Alexa to control your lights seamlessly.
Setting Up Context-Aware Lighting
Context-aware lighting is a feature of Alexa that allows you to control all the lights in a specific room with a single command. To set up context-aware lighting, you’ll need an Amazon Echo device and compatible smart lights. Follow these steps:
- Open the Alexa app and navigate to the “Devices” tab.
- Tap the “+” icon at the top-right corner of the screen.
- Select “Add Group” to create a new light group.
- Give the group a name, such as “Living Room” or “Bedroom.”
- Choose the smart lights you want to include in the group.
- Assign the light group to an Amazon Echo device.
- Save the settings.
Now, when you say, “Alexa, turn on the lights,” Alexa will turn on the light group associated with the Echo device nearest to you. You can also control specific light groups by mentioning their names in your voice command.
Building Light Groups for Easy Control
In addition to context-aware lighting, you can create custom light groups for easy control. These groups can include lights from different rooms or areas of your home. Here’s how to build a light group:
- Open the Alexa app and go to the “Devices” tab.
- Tap the “+” icon at the top-right corner of the screen.
- Select “Create a room or device group.”
- Choose a pre-defined room name or create a custom name for the group.
- Select the lights you want to include in the group.
- Optionally, add any Alexa devices to the group.
- Save your room settings.
Once your light group is set up, you can control all the lights in that group with a single voice command. For example, saying “Alexa, turn on Dining Room” will activate the lights in the designated group.
Controlling Lights with Alexa Voice Commands
Controlling your smart lights with Alexa is as simple as using voice commands. Here are some examples of commands you can use:
- “Alexa, turn on [name of light]”
- “Alexa, turn off [name of light]”
- “Alexa, dim the [room name]”
- “Alexa, make the [room name] brighter”
- “Alexa, set the [room name] lights to blue”
- “Alexa, set the [room name] lights to 50% brightness”
Feel free to experiment with different commands to find the ones that suit your preferences. Alexa’s voice recognition capabilities make controlling your lights effortless.
Dimming and Changing Colors with Alexa
If your smart lights support dimming or changing colors, you can easily adjust these settings using Alexa. Here’s how:
- Dimming Lights: Say “Alexa, dim the [room name]” to lower the brightness of the lights in a specific room. You can specify the desired brightness level as well, such as “Alexa, set the [room name] lights to 50% brightness.”
- Changing Colors: If your smart lights offer color options, you can command Alexa to change the colors. For example, say “Alexa, make the front light purple” or “Alexa, set the [room name] lights to red.”
Experiment with different colors and brightness levels to create the perfect ambiance for any occasion.
Controlling Lights with Alexa from a Fire Tablet
In addition to using voice commands, you can control your smart lights with Alexa from a Fire tablet. Here’s how:
- Open the Alexa app on your Fire tablet.
- Tap the “Devices” tab at the bottom of the screen.
- Select the group or individual lights you want to control.
- Use the on-screen controls to turn the lights on or off, adjust brightness, or change colors.
Controlling your lights from a Fire tablet gives you an alternative option when voice commands are not convenient or possible.
Automating Lights with Routines
One of the most powerful features of Alexa is the ability to create routines. Routines allow you to automate the behavior of your smart lights based on specific triggers or schedules. Here’s how to create a routine:
- Open the Alexa app and tap the three horizontal lines at the top-left corner.
- Select “Routines” from the menu.
- Tap the “+” icon to create a new routine.
- Choose a trigger for your routine, such as “At a scheduled time.”
- Set the time and days for the routine to activate.
- Select the action you want to perform, such as turning on specific lights or changing their colors.
- Customize the routine further by adding additional actions or conditions.
- Save the routine.
With routines, you can automate your lighting according to your daily schedule or specific events, such as sunrise or sunset. This feature adds convenience and enhances the overall smart home experience.
Troubleshooting Common Issues
While setting up and controlling your smart lights with Alexa is usually straightforward, you may encounter some common issues. Here are a few troubleshooting tips:
- Ensure that your smart lights are within range of your Wi-Fi network.
- Check that your smart lights are compatible with Alexa and have the latest firmware updates installed.
- Restart your smart lights and the Alexa device you’re using.
- Make sure your Alexa device and smart lights are connected to the same Wi-Fi network.
- Disable and re-enable the skill or app associated with your smart lights in the Alexa app.
- Reset your smart lights according to the manufacturer’s instructions and set them up again.
If you’re still experiencing issues, consult the troubleshooting guide provided by the manufacturer or contact their customer support for assistance.
Recommended Smart Light Brands Compatible with Alexa
When choosing smart lights that are compatible with Alexa, several reputable brands offer reliable and feature-rich options. Some of the recommended brands include:
- Philips Hue
- LIFX
- TP-Link
- Nanoleaf
- Yeelight
These brands provide a wide range of smart light bulbs, strips, and other lighting solutions that seamlessly integrate with Alexa. Consider your specific lighting needs and preferences when selecting the right brand for your smart home setup.
Conclusion
Controlling your smart lights with Alexa adds a new level of convenience and flexibility to your home lighting system. With just a few simple voice commands, you can turn your lights on and off, adjust brightness, change colors, and even automate their behavior. By following the steps outlined in this guide, you’ll be able to set up and control your smart lights with ease. Enjoy the benefits of a smart home and enhance your lighting experience with Alexa and smart lights.
Remember to regularly check for firmware updates for your smart lights and the Alexa app to ensure optimal performance and access to the latest features. With the knowledge gained from this guide, you’ll be well-equipped to create the perfect lighting atmosphere in your home using Alexa and your smart lights.
Experiencing difficulties with your Device, check out our “How To” page on how to resolve some of these issues.