If you’re one of the many Windows 11 users who are looking for a way to uninstall Spotify from their devices, you’ve come to the right place. In this comprehensive guide, we will walk you through the process of completely removing Spotify from your Windows 11 system. We will cover different methods of uninstallation, including using the built-in uninstaller, the command prompt, and third-party uninstaller tools. By the end of this article, you will have a clear understanding of how to uninstall Spotify on Windows 11.
Why Uninstall Spotify on Windows 11?
Before we dive into the uninstallation process, let’s explore some of the reasons why you might want to remove Spotify from your Windows 11 computer. While Spotify is a popular music streaming app, there are various scenarios where you might consider uninstalling it:
- You prefer using a different music streaming service and no longer need Spotify.
- The app was automatically installed without your consent during a Windows Update.
- You want to free up storage space on your Windows 11 device.
- You are experiencing performance issues or compatibility conflicts with Spotify.
Now that we understand the potential motivations behind uninstalling Spotify, let’s proceed with the step-by-step uninstallation process.
Uninstalling Spotify using the Built-in Uninstaller
The easiest way to uninstall Spotify from your Windows 11 computer is by using the built-in uninstaller. Follow these steps:
- Open the Start menu by clicking on the Windows logo in the taskbar.
- Click on “Settings” to access the Windows Settings menu.
- In the Settings menu, click on “Apps” to view the list of installed applications.
- Scroll down the list until you find “Spotify” and click on it.
- Select “Uninstall” and confirm the uninstallation when prompted.
- Wait for the uninstallation process to complete.
- Restart your computer to ensure that all Spotify files have been removed.
Uninstalling Spotify using the Command Prompt
Alternatively, you can use the Command Prompt to uninstall Spotify on Windows 11. Follow these steps:
- Press the Windows key + R to open the Run dialog box.
- Type “cmd” and press Enter to open the Command Prompt.
- In the Command Prompt window, type the following command and press Enter:
wmic product where name="Spotify" call uninstall
- Wait for the uninstallation process to complete.
- Restart your computer to ensure that all Spotify files have been removed.
Uninstalling Spotify using Third-Party Uninstaller Tools
If you prefer using third-party software to uninstall applications, there are several options available for removing Spotify from your Windows 11 computer. Here are a few popular choices:
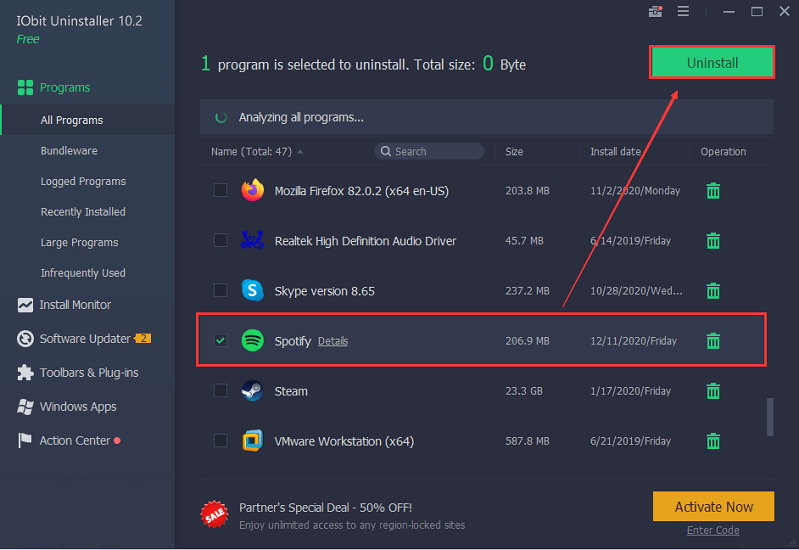
- IObit Uninstaller: Download and install IObit Uninstaller from their official website. Open the program, locate Spotify in the list of installed programs, select it, and click on the “Uninstall” button. Follow the on-screen instructions to complete the uninstallation process.
- Revo Uninstaller: Download and install Revo Uninstaller from their official website. Launch the program, find Spotify in the list of installed applications, select it, and click on the “Uninstall” button. Follow the prompts to uninstall Spotify completely.
- Geek Uninstaller: Download and install Geek Uninstaller from their official website. Open the program, locate Spotify in the list of installed applications, right-click on it, and select “Uninstall.” Follow the instructions provided by the uninstaller to remove Spotify from your computer.
Manually Deleting Remaining Files and Folders
In some cases, after using the uninstallation methods mentioned above, you may still find traces of Spotify on your Windows 11 computer. To ensure complete removal, you can manually delete any remaining files and folders associated with Spotify. Here’s how:
- Open File Explorer by clicking on the folder icon in the taskbar or by pressing Windows key + E.
- Navigate to the following directory: C:\Program Files.
- Look for the “Spotify” folder and delete it.
- Additionally, search for any other files or folders related to Spotify and delete them.
- Empty the Recycle Bin to permanently remove the deleted files.
Restart your computer to ensure that all remaining traces of Spotify have been successfully removed.
Removing Spotify from the Registry
If you still see Spotify listed in your installed programs or if you encounter any issues uninstalling Spotify, you may need to remove it from the Windows registry. Here’s how:
- Press the Windows key + R to open the Run dialog box.
- Type “regedit” and press Enter to open the Registry Editor.
- In the Registry Editor, navigate to the following key: HKEY_LOCAL_MACHINE\SOFTWARE\Microsoft\Windows\CurrentVersion\Uninstall
- Look for the Spotify folder in the list of entries and delete it.
- Close the Registry Editor.
- Restart your computer to ensure that any remaining registry entries are removed.
Preventing Spotify from Being Reinstalled
If you want to prevent Spotify from being automatically reinstalled during Windows Updates, you can use the Windows Settings app to block its installation. Here’s how:
- Open the Start menu and click on “Settings.”
- In the Settings menu, click on “Apps.”
- Scroll down and find Spotify in the list of installed apps.
- Click on Spotify and select “Uninstall.”
- In the uninstallation dialogue box, select the option to “Prevent this app from being installed.”
- Confirm the uninstallation and the prevention of future installations.
By following these steps, you can ensure that Spotify won’t be automatically installed on your Windows 11 computer.
Troubleshooting: What to Do If You Can’t Find Spotify in the Uninstall List
If you can’t find Spotify in the list of installed apps or encounter difficulties uninstalling it, try the following troubleshooting steps:
- Double-check that Spotify is installed on your computer by searching for it in the Start menu or using the Windows Search bar.
- If you have the Spotify desktop app pinned to your taskbar, right-click on it and select “Uninstall.”
- If you’ve installed Spotify from the Microsoft Store, open the Store app, search for Spotify, and click on the “Uninstall” button.
If none of these options work, you may need to use a third-party uninstaller or manually delete the Spotify files as described in earlier sections.
Removing Traces of Spotify from Your Computer
To ensure that all traces of Spotify are removed from your computer, you can take additional steps beyond the standard uninstallation process. Here are a few suggestions:
- Use a disk cleanup tool to remove temporary files and other remnants that may be associated with Spotify.
- Clear your browser cache and cookies, especially if you’ve used Spotify’s web player.
- Delete any shortcuts or bookmarks related to Spotify.
- Remove any saved login credentials or autofill data for Spotify from your browser.
By performing these additional steps, you can thoroughly clean up your system and remove any remaining traces of Spotify.
Safety Precautions When Uninstalling Spotify
Uninstalling Spotify is generally safe and will not delete your account or any of your music or playlists. However, it’s always a good idea to back up any important data before making any changes to your computer’s configuration. Additionally, exercise caution when using third-party uninstaller tools and ensure you download them from reputable sources.
If you want to retain your Spotify account but remove the app from your computer, you can still access Spotify through its web player or mobile apps.
Conclusion
We hope this step-by-step guide has provided you with the necessary instructions to uninstall Spotify from your Windows 11 computer. Whether you’re switching to a different music streaming service or simply freeing up storage space, removing Spotify is a straightforward process when following the methods outlined in this article. Remember to double-check for any remaining files or registry entries and take the necessary precautions to ensure a smooth uninstallation process.
Related FAQs
How do I remove Spotify from Windows 11?
To uninstall Spotify on Windows 11, go to the Start menu, type “Add or Remove Programs,” and open it. From there, you should see a list of all the programs installed on your computer. Find Spotify in the list, select it, then click on the Uninstall button. Confirm the uninstallation, and the program will be removed from your computer.
Is there a way to uninstall Spotify more quickly?
Yes. To quickly uninstall Spotify on Windows 11, you can use the Windows Settings app. Go to Settings, then Apps, and find Spotify in the list. Select it, then click on the Uninstall button. Confirm the uninstallation, and the program will be removed from your computer.
What if I can’t find the Spotify app in the list?
If you can’t find the Spotify app in the list, it’s likely that the program was already uninstalled. To check if this is the case, you can use the Windows Search bar to search for Spotify. If the program doesn’t appear, then it has already been uninstalled.
How do I prevent Spotify from being reinstalled?
To prevent Spotify from being reinstalled, you can use the Windows Settings app. Go to Settings, then Apps, and find Spotify in the list. Select it, then click on the Uninstall button. Then, select the “Prevent this app from being installed” option. This will prevent the program from being reinstalled in the future.
Is there a way to remove any traces of Spotify from my computer?
Yes. To remove any traces of Spotify from your computer, you can use the Windows Settings app. Go to Settings, then Apps, and find Spotify in the list. Select it, then click on the Uninstall button. Then, select the “Delete all user data” option. This will remove any remaining traces of Spotify from your computer.
Remember, uninstalling Spotify on Windows 11 is a relatively straightforward process that can be easily accomplished by following the clear instructions provided above. By doing so, you can free up space on your device and ensure a smooth transition to your preferred music streaming service.
Experiencing difficulties with your Device, check out our “How To” page on how to resolve some of these issues.