
Apple has always ensured to bring something new with their every inception, be it a smartphone, Macbook or OS. Latest MacBook OS Majave is such great inception by the company that was presented with loads of new features. Continuity camera is definitely one of the most exciting of them. Continuity camera feature on MacBook pro is highly useful that can import images and scanned documents directly onto a file which you are creating in Mac. It sounds really interesting. However, the beginners will find it a bit difficult. So, we have explained in this article in more details that how to use the Continuity camera feature on MacBook Pro. Have a read to know the process.
Before you go ahead to use this feature on your MacBook, read here the requirements first.
Requirements
- Both the device Mac and the iPhone or iPad whatever you will use should be close to each other.
- It requires MacOS Mojave and iOS 12.
- They should be connected under the same Wi-Fi network.
- Both the device Mac and iPhone should be logged into the same Apple ID.
How to use the Continuity camera feature on MacBook Pro
You can use this new camera feature in the MacBook pro either to add images or to scan documents. Both the processes are explained one by one.
Add images using Continuity camera
There are some apps that support this continuity camera feature. So, when you work on this app, this camera feature can be used to import and add images directly onto the Mac file.
- First, launch the app. For example, you can use TextEdit.
- Create a new project.
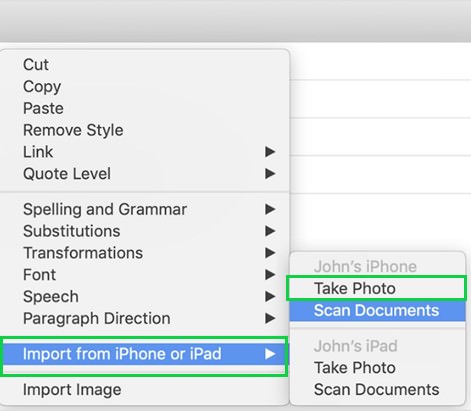
- Right click on a space where the image is to be inserted.
- At the top bar, there is a task menu. Tap on that to insert images. Select the option ‘import from iPhone or iPad’.
- Tap on Take
- It will automatically launch the iPhone camera.
- So, take a photo and then tap on ‘Use photo’. If you are not satisfied with the captured image, tap on ‘Retake’ to take one more image. As you tap on the Use Photo option on your iPhone, the captured photo will be imported to the document that you were using in MacBook Pro.
So, this is how to add images using the Continuity camera feature on MacBook Pro.
Scan document using Continuity Camera
The process is very similar.
- Launch the app first that you will use. Create a new project.
- Right click on the space where the scanned document will be inserted.
- Tap on the task menu at the top and select the option ‘import from iPhone or iPad’.
- Tap on ‘scan document’.
- Next, use your iPhone or iPad to frame the document in the onscreen
- The document will be scanned, and then you tap on ‘save’ option.
- The saved scanned documents will be available to the Mac directly.
So, the process is very simple and will take hardly any time of yours.


