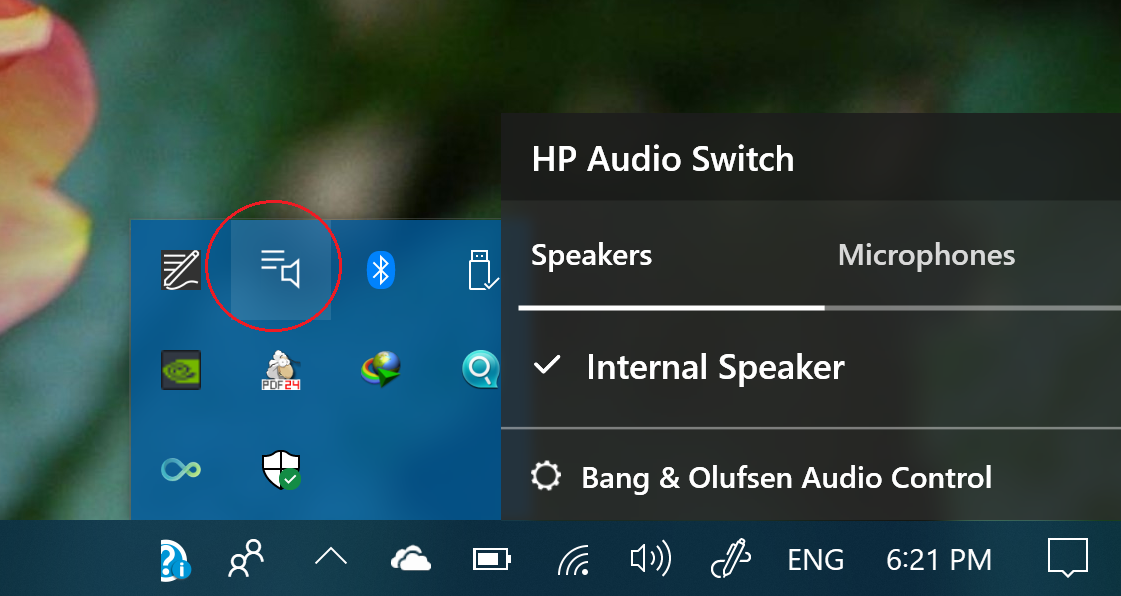
Are you frustrated with the HP Audio Switch Box that keeps popping up on your screen and refuses to go away? You’re not alone. Many HP users have encountered this common issue where the HP Audio Switch Box becomes an annoyance. While the exact reason behind this problem is unclear, it is believed that corrupted files could be the culprit. In this comprehensive guide, we will explore the various methods to remove the HP Audio Switch Box, regardless of the Windows version you are using. So, let’s dive in and find the solution to this persistent issue.
Ways to Fix HP Audio Switch Box Won’t Go Away
Disable the Audio Switch at Startup
To disable the HP Audio Switch Box from appearing at startup, you need to access the Task Scheduler. Follow these steps:
- Open the Control Panel and click on “System and Security”.
- Scroll down and click on “Administrative Tools”.
- In the new window, find and double-click on “Task Scheduler”.
- In the right-hand menu, click on “Task Scheduler Library”.
- Look for “HP Audio Switch” in the list of tasks and click on it.
- Underneath the Selected Item section, click on “Disable”.
- Restart your PC to see if the HP Audio Switch Box disappears.
If you wish to re-enable the HP Audio Switch in the future, follow the same steps and click on “Enable” instead of “Disable”. However, if you choose to delete the task, you won’t be able to enable it again.
Update the Audio Drivers
Outdated or corrupted audio drivers can often cause the HP Audio Switch Box to appear. To resolve this, update your audio drivers by following these steps:
- Open the Windows Control Panel and select “Hardware and Sound”.
- Under the “Devices and Printers” section, click on “Device Manager”.
- Look for “Sound, video, and game controllers” in the list and expand it.
- Right-click on the HP Audio driver or your computer’s main audio device/speaker.
- Choose the “Update Driver” option.
- Select the “Browse my computer for drivers” option.
- Choose the appropriate audio drivers from the list or download them from the HP website.
- Follow the on-screen instructions to complete the driver update.
Updating the audio drivers should overwrite any corrupted files and resolve the issue with the HP Audio Switch Box.
Repair Corrupted Files using Windows System File Checker
If updating the audio drivers doesn’t solve the problem, you can try repairing any corrupted files using the Windows System File Checker. Here’s how:
- Type “CMD” in the search bar on the Windows taskbar.
- Right-click on “Command Prompt” and select “Run as Administrator”.
- In the Command Prompt window, type “DISM.exe /Online /Cleanup-image /Restorehealth” (without quotation marks) and press Enter.
- Wait for the process to complete (approximately 30 minutes).
- Once the operation is successfully completed, type “sfc/scannow” (without quotation marks) and press Enter.
- Create a system restore point before running the System File Checker by typing “Create a restore point” in the search bar and following the instructions.
- Restart your computer to see if the HP Audio Switch Box disappears.
Scan Your Computer for Viruses
Sometimes, the HP Audio Switch Box may be caused by malware or viruses disguised as the application. To ensure your computer is clean, perform a full system scan using your antivirus software. Here’s how:
- Open Windows Security or your preferred antivirus software.
- Look for the “Virus and threat protection” option in the left-hand menu.
- Click on “Scan options” below the Quick Scan button.
- Select “Full Scan” and click on “Scan now”.
Allow the antivirus software to scan your entire system for any potential threats. If any viruses or malware are detected, follow the recommended actions to remove them. This should eliminate any issues related to the HP Audio Switch Box.
Uninstalling the HP Audio Switch
If all else fails, you can uninstall the HP Audio Switch app from your computer. Please note that uninstalling this app should not affect the proper functioning of your computer. Here’s how to uninstall the HP Audio Switch:
- Open the Control Panel from the Windows Start Menu.
- Click on the “Uninstall a program” option under Programs.
- Locate “HP Audio Switch” in the list of installed programs.
- Right-click on it and choose “Uninstall”.
- Follow any prompts that appear to complete the uninstallation process.
To be safe, consider creating a system restore point before uninstalling any HP software. You can download the HP Audio Switch from the manufacturer’s website if you wish to reinstall it later.
Conclusion
Dealing with the HP Audio Switch Box that won’t go away can be frustrating, but by following the methods outlined in this guide, you should be able to resolve the issue. Whether you choose to disable the audio switch at startup, update your audio drivers, repair corrupted files, scan for viruses, or uninstall the HP Audio Switch, one of these solutions should help eliminate the persistent pop-up. Remember to create a system restore point before making any changes to your system, and consult the HP website for the latest audio drivers and software updates. With these steps, you can regain control over your computer and enjoy a hassle-free audio experience.
Remember, if you ever need assistance with any tech-related issues, our team of knowledgeable experts is here to help. Stay tuned for more helpful guides and tips to enhance your tech journey.
Experiencing difficulties with your Device, check out our “How To” page on how to resolve some of these issues.