
Institutions require the reproduction of documents in their daily activities. Dissemination of information is essential for the delivery of services. A printer is necessary for any shop floor for a range of operations. Printer services are diverse which require a printer with inherent functionality such as Officejet 6500 wireless printer. Even if you want to get a printer, the question remains “how will you do the setup?”
Officejet 6500 wireless printer is undeniably the best choice. Models of printers are available with an opportunity cost in every make depending on the intended use.
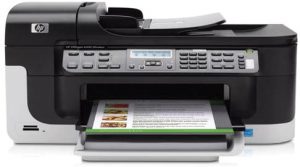
Officejet 6500 wireless printer machine is designed to perform complex tasks in any setting. Print, scan or fax services require the use of Office jet 6500.
The setup is integrated with a wireless network (Wi-Fi) and a computer of any model commonly MAC or Windows. The installation process determines the functional capability of the printer.
Provided below is a procedure for the installation of the Officejet 6500 wireless printer and the other Office instruments. You need to remember that Network access is necessary to make the soft wherein the printer functional.
The procedures below are for the MAC computers and the Windows PC. Set up your wireless-capable printer on a local wireless network for both Mac computer and Windows PC.
Windows computer -printer installation
Integrate your wireless Officejet 6500 wireless printer on a local wireless network with a Windows computer.
STEP 1: INSTALLATION REQUIREMENTS
The router, printer, and computer need to be turned on. The details of the network that is the password and the network name are required in the process.
The network name will be the SSID (Service Set Identifier). The password is also sometimes called as the WEP key or WPA security passphrase.
The computer and the network accessibility should be on the most recommendable network that is the broadband Internet access such as cable or DSL for software downloads, using Web Services, and getting printer update.
The computer should be connected to the same wireless network that is the network you want to connect to the printer. You need to place the printer close to the computer after turning it on.
STEP 2: ESTABLISHING CONNECTION BETWEEN THE PRINTER AND WIRELESS NETWORK
To connect the printer to the wireless network you will be required to use the wireless setup on the printer.
Step 1: Press the instruction button on the printer control panel. The menu will appear with instructions on it.
Step 2: Press the Right Arrow button. The options will be displayed on the menu. Select the Network Settings option, and then press the OK button at the bottom.
Step 3: Press the Right Arrow button to select Wireless Setup Wizard, and then press the OK button.
STEP 3: PRINTER SOFTWARE:
Step 1: The printer and the computer should be on. The ON button on the printer is on the backside of the printer. Turn it on and it will display the features on the screen.
Step 2: The connections such as the USB need to be disconnected though they will be required in the subsequent procedures.
Step 3: On the display information select the instruction stated as “let’s identify your product to get started”. The options will appear on the screen and click the printer.
Feed the printer model number on the option space that appears.at the bottom of the display click on the submit option.
Step 4: Download the software package for ensuring that the drivers are up-to-date. These are necessary since many updates have been made by the company since the date of manufacture.
MAC COMPUTER-PRINTER INSTALLATION
Before starting, you need to set up your Officejet 6500 wireless printer on a local wireless network with your Mac computer.
STEP 1: PREPARE FOR INSTALLATION
The requirements are that the printer is connected to your wireless network, get the network name and the password should be recorded somewhere for further use.
Make sure to check whether the router, printer and the computer are turned on or not. If not, turn them on. The network name should be the service set identifier (SSID).
These are accessed through the network display. On the MAC set up the password is displayed as the WEP key or WPA security passphrase. Your computer needs to be connected to the wireless network.
Internet connection type should be wireless internet access or the DSL which is recommendable for the software downloads, accessing the Web Services, and getting printer updates.
Before proceeding you need to turn on the printer, the router, and the computer. The computer needs to be connected to the same wireless network with a printer that needs the installation.
Make sure to put the Officejet 6500 wireless printer near your computer and turn it on. Also, remember to place the printer within the range of your router.
The on button of the printer is on the backside. The display of the printer will show on the screen. The Ethernet cable and the USB need to be disconnected to avoid interference.
STEP 2: ESTABLISHING CONNECTION BETWEEN THE PRINTER AND WIRELESS NETWORK:
On the display open the Wireless Setup MENU on the printer to connect it to your wireless network.
Step 1: Click the Setup button on the printer control panel and further instruction will be displayed.
Step 2: Press the Arrow button to select Network Settings to select the network connected to your computer, and then press the OK button.
Step 3: Press the Arrow button to select Wireless Setup To go back to the display instruction, and then press the OK button.
STEP 3: INSTALL DRIVER AND LINK THE PRINTER TO THE MAC
Open the Apple menu on the display, then click System Preferences. The details will appear on the display screen, click Print & Fax, Print & Scan, or Printers & Scanners. Information will be uploaded automatically.
Step 1: Click on the Apple menu. The menu window will appear. Find and select System Preferences.
Step 2: Depending on your operating system version, click Print & Fax, Print & Scan, or Printers & Scanners.
STEP 4: CONNECTION OF SOFTWARE
The list of connected printers will be displayed on the screen. Add the printer using the printer model name.
Step 1: Click on the name of your printer.
Step 2: Once you have selected the name of your printer, press the delete button or the minus sign to delete the printer.
Step 3: Once the printer is removed, click the plus sign.
Step 4: Now you need to click on the “Add Printer” or “Scanner” option, then click the name of your printer. Finally, press the proceed button.
Step 5: Click Download and Install to complete the installation.
WRAPPING UP
Most printers have the same format in the installation. It is necessary to ensure that you have the model name of the printer. Officejet 6500 wireless printer is designed to perform a range of operations.
The printer is durable and has a track record of high functioning ability. The installation guidelines provided above apply to any user. For the installation that requires complex activities, it’s necessary to consult an IT expert.
I hope the steps discussed above were of some help.
Experiencing difficulties with your Device, check out our “How To” page on how to resolve some of these issues.


