In this digital age, our iPhones have become an extension of ourselves, storing our precious memories, personal information, and essential data. Losing or damaging our iPhones can lead to a devastating loss of all this valuable content. That’s why it’s crucial to back up your iPhone regularly, ensuring that your data is safe and easily recoverable. In this comprehensive guide, we’ll walk you through various methods to back up your iPhone, whether you prefer using iCloud, your Mac, or a Windows PC.
Why Backing Up Your iPhone is Essential
Before we dive into the methods of backing up your iPhone, let’s understand why it’s so important. Our iPhones contain a wealth of valuable data, from contacts and notes to photos and files. Losing this data can be devastating, causing inconvenience and heartbreak. By creating regular backups, you can safeguard your data and ensure that it’s easily recoverable in case of any unforeseen circumstances.
Choosing the Right Backup Method
Apple provides multiple ways to back up your iPhone, each with its own advantages. You have the option to back up to iCloud, your Mac, or iTunes on a Windows PC. The method you choose will determine the frequency of your backups and the ease of restoring your data.
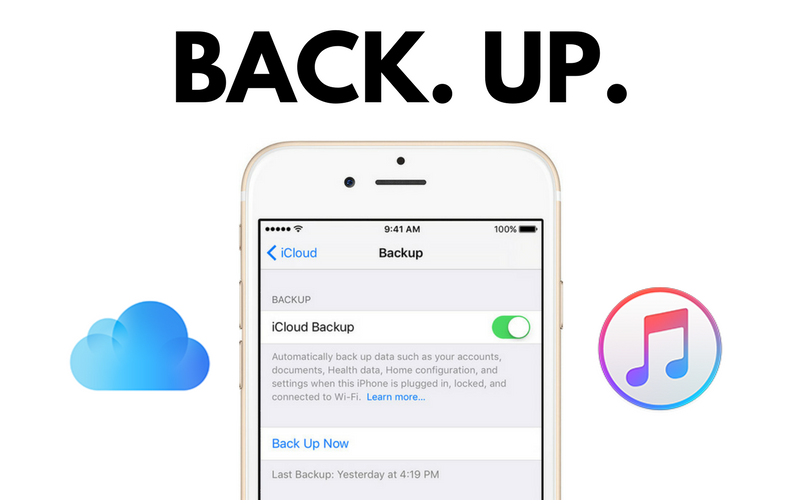
iCloud Backup: Easy and Automatic
One of the most convenient ways to back up your iPhone is through iCloud. When you use iCloud backup, your iPhone automatically backs up whenever it is locked, connected to power, and connected to a Wi-Fi network. This ensures that your data is constantly protected without any manual effort.
To back up your iPhone to iCloud, follow these simple steps:
- Open Settings on your iPhone.
- Tap your name at the top of the Settings app.
- Select iCloud.
- Scroll down and tap on iCloud Backup.
- Toggle on the iCloud Backup slider.
- Tap Back Up Now to initiate an immediate backup.
It’s worth noting that iCloud provides 5GB of free storage for backups. If you need more space, you can purchase additional iCloud storage from Apple.
Backing Up to Your Mac: Local and Reliable
If you prefer a local backup solution or have limited iCloud storage, backing up your iPhone to your Mac is an excellent option. When you connect your iPhone to your Mac, it will automatically back up your device, ensuring that your data is safely stored on your computer.
The process of backing up your iPhone to a Mac varies depending on the version of macOS you’re running:
macOS Catalina 10.15 or later:
- Connect your iPhone to your Mac using a Lightning-to-USB or Lightning-to-Thunderbolt cable.
- If prompted, enter your passcode on your iPhone to trust the computer.
- Open a Finder window and locate your iPhone in the Locations section of the sidebar.
- Click on your iPhone and select General.
- Choose Back up all of the data on your iPhone to this Mac.
- If you want to encrypt your backup and protect sensitive information, select Encrypt your backup.
- Click Back Up Now to start the backup process.
macOS Mojave 10.14 or earlier:
- Connect your iPhone to your Mac using a Lightning-to-USB cable.
- Enter your passcode on your iPhone if prompted to trust the computer.
- Open iTunes and click on the phone icon in the top left corner.
- Select Summary below your iPhone.
- Click on Back Up Now under Backups.
- If desired, enable Encrypt iPhone backup and set a password for added security.
Backing Up to a Windows PC: iTunes to the Rescue
Windows PC users can also back up their iPhones using iTunes, the trusted software from Apple. While iTunes is no longer available on macOS Catalina and later, it remains a viable option for Windows users.
To back up your iPhone to a Windows PC using iTunes, follow these steps:
- Connect your iPhone to your Windows computer using a Lightning-to-USB cable.
- Enter your passcode on your iPhone if prompted to trust the computer.
- Open iTunes and click on the iPhone button at the top left of the iTunes window.
- Select Summary.
- Click Back Up Now under Backups.
- If desired, enable Encrypt local backup and set a password for added security.
The Importance of Regular Backups
Regardless of the method you choose, it’s essential to perform regular backups to ensure that your data is up to date and protected. Regular backups provide peace of mind, knowing that even if your iPhone is lost, stolen, or damaged, you can easily restore your data to a new or repaired device.
Make it a habit to back up your iPhone at least once a week or whenever you make significant changes to your device. This will ensure that you always have access to your most recent data and can quickly recover from any unforeseen incidents.
Restoring Your iPhone from a Backup
Backing up your iPhone is only half the battle; the other half is knowing how to restore your data from a backup. Whether you’re setting up a new iPhone or need to recover your data after a factory reset, here’s how you can restore your iPhone from a backup:
- Start the initial setup process on your new iPhone or after a factory reset.
- When prompted, select Restore from iCloud Backup or Restore from Mac/PC.
- If you choose iCloud, sign in to your Apple ID and select the desired backup from the list.
- If you choose Mac/PC, connect your iPhone to the computer and follow the on-screen instructions to select the backup you want to restore.
Please note that restoring your iPhone from a backup will overwrite any existing data on your device. It’s crucial to choose the correct backup and ensure that you have a recent backup available to avoid any data loss.
Additional Tips and Considerations
Managing iCloud Storage
If you’re using iCloud backup and find yourself running out of storage space, there are a few ways to manage your iCloud storage:
- Delete unnecessary data: Regularly review and delete unwanted photos, videos, and files from your iCloud storage to free up space.
- Optimize iCloud Photo Library: Enable the Optimize iPhone Storage option in the Photos section of your iCloud settings. This will store lower-resolution versions of your photos on your iPhone, saving space in iCloud.
- Purchase additional storage: If you need more storage, you can upgrade your iCloud storage plan by going to Settings > [Your Name] > iCloud > Manage Storage > Change Storage Plan.
Using Third-Party Backup Solutions
While Apple’s built-in backup options are reliable, there are third-party backup solutions available that offer additional features and flexibility. One such solution is Acronis Cyber Protect, which provides comprehensive backup, cybersecurity, and endpoint management in one integrated solution. Acronis Cyber Protect offers seamless backup and recovery options for both iOS and other platforms, ensuring your data is protected across all your devices.
Testing Your Backups
It’s crucial to periodically test your backups to ensure their integrity and usability. Select a few random files or photos and attempt to restore them from your backup to verify that the process works smoothly. Regular testing will give you confidence in the reliability of your backups and allow you to address any issues promptly.
Conclusion
Backing up your iPhone is a crucial step in protecting your valuable data. Whether you choose iCloud, your Mac, or a Windows PC, regularly creating backups ensures that your information is safe and easily recoverable. Remember to perform backups regularly, choose a backup method that suits your needs, and test your backups periodically for peace of mind. By following these steps, you’ll have the confidence that your iPhone data is secure, no matter what happens.
Experiencing difficulties with your Device, check out our “How To” page on how to resolve some of these issues.