
In today’s digital age, Microsoft Word has become an indispensable tool for creating and editing documents. Whether you’re drafting a report, writing a letter, or designing a form, Word provides a wide range of features to enhance your productivity. One such feature is the ability to create a dropdown list, which allows users to select from a predefined set of options. In this article, we will explore the step-by-step process of creating a dropdown list in Microsoft Word, empowering you to streamline data entry and improve accuracy.
1. Enable the Developer Tab
Before you can create a dropdown list in Microsoft Word, you need to enable the Developer tab. By default, this tab is hidden, but you can easily enable it by following these steps:
- Open Microsoft Word on your Windows or Mac computer.
- Click on the File menu at the top-left corner of the screen.
- Select Options from the dropdown menu.
- In the Word Options window, click on Customize Ribbon in the left sidebar.
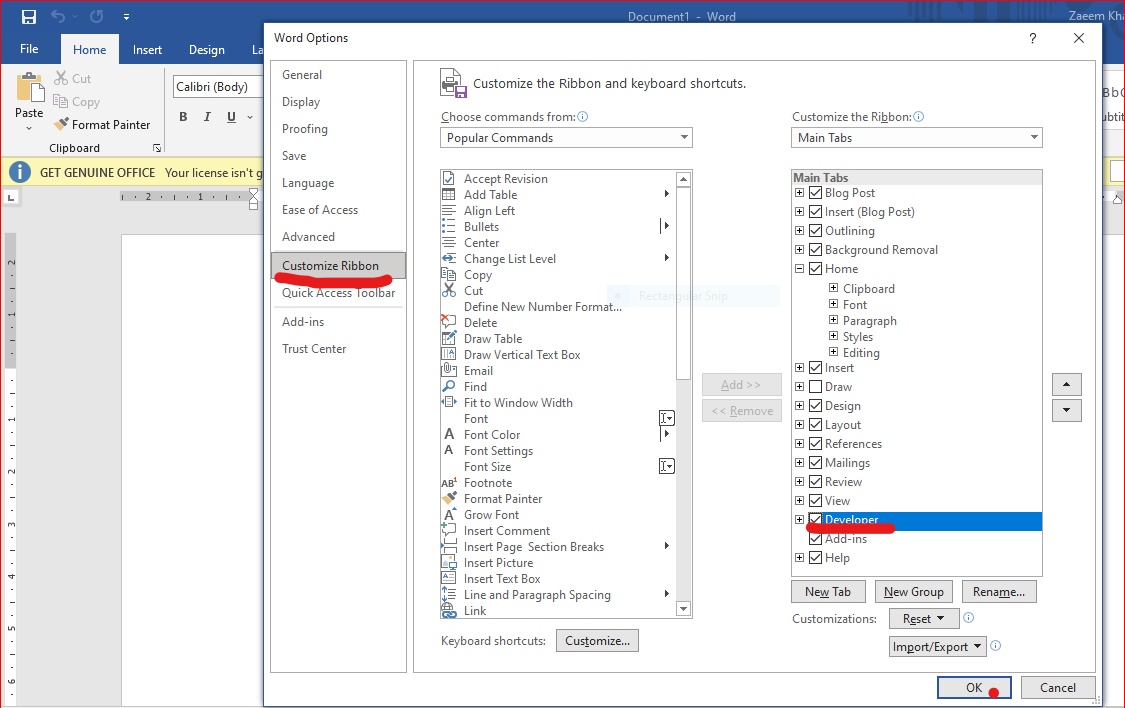
- Scroll down the list of tabs on the right side of the window and check the box next to Developer.
- Click OK to save the changes and close the Word Options window.
With the Developer tab now enabled, you can proceed to insert the dropdown list content control.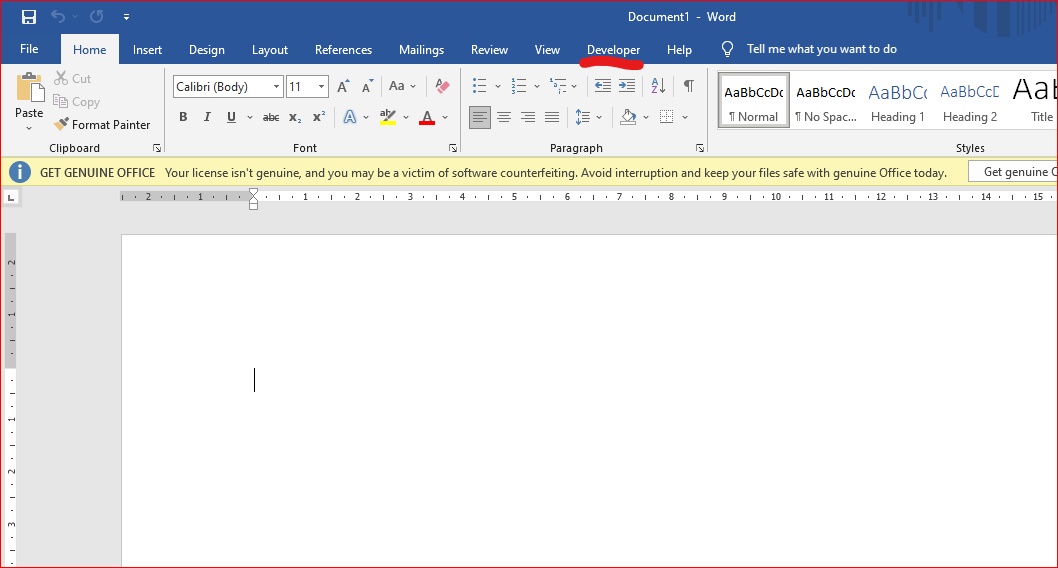
2. Insert the Dropdown List Content Control
Once you have enabled the Developer tab, you can insert the dropdown list content control into your Word document. Follow these steps to add the control:
- Open the Word document where you want to insert the dropdown list.
- Place your cursor at the desired location within the document.
- Switch to the Developer tab in the Word ribbon.
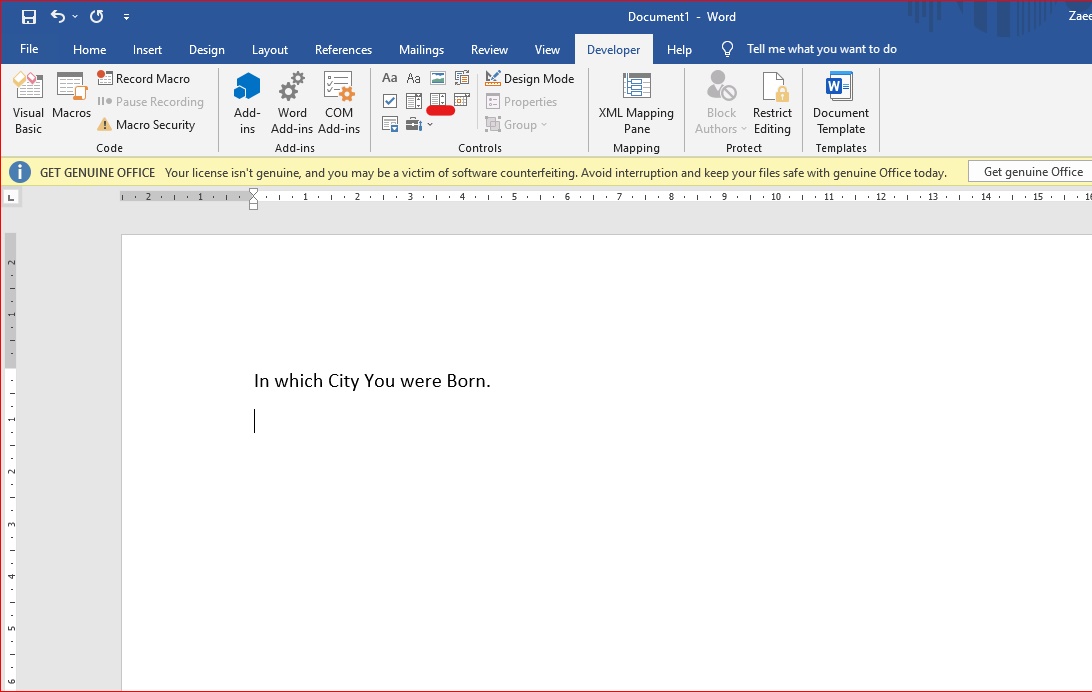
- In the Controls group, click on the Dropdown List Content Control button. This button is represented by a small downward arrow inside a box.
- The dropdown list content control will appear at the cursor position.
Congratulations! You have successfully added a dropdown list content control to your Word document. The next step is to customize the dropdown list according to your requirements.
3. Customize the Dropdown List
Now that you have inserted the dropdown list content control, you can customize it to suit your needs. To do this, follow these instructions:
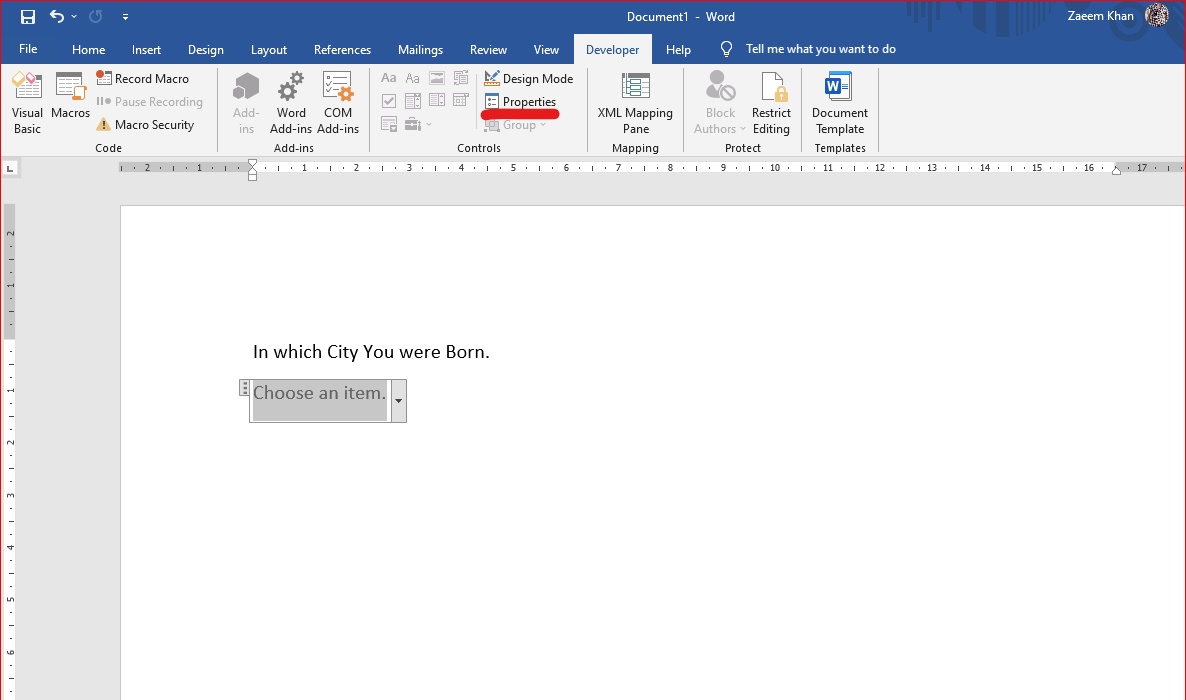
- Select the dropdown list content control by clicking on it.
- Switch to the Developer tab in the Word ribbon.
- In the Controls group, click on Properties. This will open the Content Control Properties window.
- In the Content Control Properties window, you can set various options for the dropdown list:
- Title and Tag: Enter a title for the dropdown list. The tag field is used for identifying the control in the document’s XML structure.
- Show as: Choose how you want the dropdown list to be displayed. The default option is “Bounding Box,” but you can also choose “Start/End Tags” for a different visual style.
- Color and Style: Customize the appearance of the dropdown list by selecting a color scheme and style.
- Locking: Specify whether the content control can be deleted or edited. You can lock the control to prevent accidental changes.
- Once you have configured the desired options, click OK to save the changes and close the Content Control Properties window.
By customizing the dropdown list, you can ensure that it meets your specific requirements and matches the overall design of your Word document. The next step is to add items to the dropdown list.
4. Add Items to the Dropdown List
To make the dropdown list functional, you need to add items that users can choose from. Follow these steps to populate the dropdown list:
- Select the dropdown list content control by clicking on it.
- Switch to the Developer tab in the Word ribbon.
- In the Controls group, click on Properties to open the Content Control Properties window.
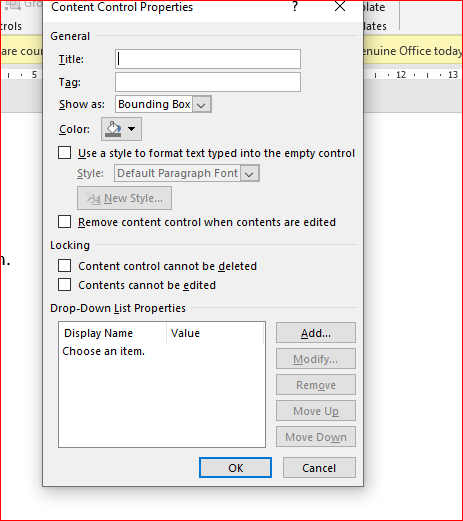
- In the Content Control Properties window, click on the Add button under the Drop-Down List Properties section.
- In the Add Choice window, enter the display name for the item in the Display Name field. This is the text that will appear in the dropdown list.
- Optionally, you can enter a value for the item in the Value field. This value is associated with the selected item and can be used for data processing purposes.
- Click OK to add the item to the dropdown list.
- Repeat steps 4-7 for each item you want to add to the list.
You can add as many items as you need to the dropdown list. Each item will be displayed in the dropdown list in the order you added them. Once you have added all the items, you can rearrange their order if necessary.
5. Rearrange the Order of Items
If you want to change the order of items in the dropdown list, you can easily rearrange them using the Move Up and Move Down buttons. Follow these steps to reorder the items:
- Select the dropdown list content control by clicking on it.
- Switch to the Developer tab in the Word ribbon.
- In the Controls group, click on Properties to open the Content Control Properties window.
- In the Content Control Properties window, select the item you want to move.
- Click on either the Move Up or Move Down button to change the item’s position in the list.
- Repeat steps 4-5 until you have rearranged the items to your desired order.
- Click OK to save the changes and close the Content Control Properties window.
By rearranging the items in the dropdown list, you can ensure that they are presented in a logical and intuitive order for users to select from. Once you are satisfied with the list’s order, you can proceed to use and test the dropdown list in your Word document.
6. Remove the Dropdown List Control
If you no longer need the dropdown list in your Word document, you can easily remove it. Follow these steps to delete the dropdown list control:
- Select the dropdown list content control by clicking on it.
- Switch to the Developer tab in the Word ribbon.
- In the Controls group, click on Properties to open the Content Control Properties window.
- In the Content Control Properties window, uncheck the Content control cannot be deleted option.
- Click OK to save the changes and close the Content Control Properties window.
- Right-click on the dropdown list control in your Word document.
- Select Remove Content Control from the context menu.
- The dropdown list control will be deleted from your Word document.
By following these steps, you can easily remove the dropdown list control if it is no longer required or if you want to make changes to the document’s structure.
7. Limit Data Entry Options Using a Dropdown List
One of the main advantages of using a dropdown list in Microsoft Word is the ability to limit data entry options. By providing users with a predefined set of choices, you can ensure consistency and accuracy in the data that is entered into the document. To limit data entry options using a dropdown list, follow these steps:
- Create a new Word document or open an existing one.
- Insert a dropdown list content control at the desired location using the steps outlined in sections 2 and 3.
- Customize the dropdown list properties to meet your requirements, including the items that will be displayed in the list.
- Save the document and distribute it to users who need to enter data.
- When users click on the dropdown list, they will only be able to select from the predefined options, preventing them from entering invalid or incorrect data.
By using a dropdown list to limit data entry options, you can improve the accuracy and reliability of the information entered into your Word documents. This is particularly useful for forms, surveys, and other documents where data consistency is important.
8. Automate Forms with Custom Fields
In addition to dropdown lists, Microsoft Word offers another powerful feature called custom fields, which allows you to automate forms and streamline data entry. By using custom fields, you can create dynamic documents that automatically update based on user input. To automate forms with custom fields, follow these steps:
- Open a new or existing Word document.
- Switch to the Developer tab in the Word ribbon.
- In the Controls group, click on Legacy Tools and select Text Form Field.
- Place the text form field at the desired location within the document.
- Right-click on the text form field and select Properties.
- In the Text Form Field Options dialog box, customize the field properties, such as the default text, maximum length, and format.
- Click OK to save the changes and close the dialog box.
- Repeat steps 3-7 for each field you want to include in your form.
- Save the document and distribute it to users. They can now enter data into the fields, and the document will automatically update based on their input.
By automating forms with custom fields, you can streamline data entry, reduce errors, and save time. This feature is particularly useful for repetitive tasks such as creating invoices, reports, or any other document that requires consistent formatting and data input.
9. Create a Simple Word Checklist
In addition to dropdown lists and custom fields, Microsoft Word provides a variety of other tools that can enhance your productivity. One such tool is the ability to create checklists, which can be useful for tracking tasks, creating to-do lists, or organizing information. To create a simple checklist in Word, follow these steps:
- Open a new or existing Word document.
- Select the location where you want to insert the checklist.
- Switch to the Home tab in the Word ribbon.
- In the Paragraph group, click on the Bulleted List button. This will apply bullet points to the selected text or create a bullet point list if there is no selected text.
- Type your checklist items, pressing Enter after each item to create a new bullet point.
- To mark an item as completed, place the cursor at the beginning of the line and press Ctrl + Shift + F9. This will convert the bullet point to a checkbox.
- Repeat step 6 for each item you want to mark as completed.
- To remove the checkbox from an item, place the cursor at the beginning of the line and press Ctrl + Shift + F9 again. This will convert the checkbox back to a bullet point.
By creating a simple checklist in Word, you can stay organized, track your progress, and ensure that no task is overlooked. This feature is particularly useful for managing projects, planning events, or keeping track of personal goals.
10. Troubleshooting Tips
While creating a dropdown list in Microsoft Word is relatively straightforward, you may encounter some challenges along the way. Here are a few troubleshooting tips to help you overcome common issues:
- If you cannot see the Developer tab in the Word ribbon, ensure that it is enabled in the Word Options menu. Refer to section 1 for detailed instructions.
- If the dropdown list is not functioning correctly, make sure that you have properly configured the properties of the dropdown list content control. Refer to section 3 for guidance.
- If you want to edit or remove an item from the dropdown list, follow the steps outlined in section 5.
- If you experience any other issues or need further assistance, consult the Microsoft Word documentation or reach out to Microsoft’s support team.
By following these troubleshooting tips, you can overcome common challenges and ensure a smooth experience when creating dropdown lists in Microsoft Word.
Conclusion
In conclusion, creating a dropdown list in Microsoft Word is a powerful way to improve data entry accuracy, streamline form filling, and enhance productivity. By following the step-by-step instructions outlined in this article, you can easily add a dropdown list to your Word documents and customize it to suit your specific needs. Additionally, we explored other features such as custom fields, checklists, and automation, which can further enhance your Word document creation process. Armed with this knowledge, you are now equipped to take full advantage of Microsoft Word’s capabilities and create professional, efficient, and user-friendly documents. So go ahead, start creating dropdown lists and elevate your document creation experience with Microsoft Word!
Experiencing difficulties with your Device, check out our “How To” page on how to resolve some of these issues.