Since the pandemic overpowered humanity and our way of life, employment across the world took a deep virtual turn. Remote and hybrid workplaces are no longer a dream. More or less all of our work is done from home, and therefore, remote access to the office computer from home is required. Windows has a plethora of remote desktop access applications to make things easier in such a work environment. The best of which is the operating system’s built-in remote access app – ‘Remote Desktop Connection.’ It is completely free, easy to use, and extremely secure.
Remote Desktop is a built-in feature of Windows. It was introduced in Windows XP and is still included in the latest Windows 11 operating system. This feature allows remote access or control over another system from anywhere through the Windows Remote Desktop Protocol (RDP). On Windows 11, Remote Desktop access is disabled by default. To use this feature, you must allow Remote Desktop Protocol.
This article will discuss the process to enable Remote Desktop in Windows 11, set it up, and connect to other remote devices thoroughly. So, keep reading.
What Is Remote Desktop In Windows 11?
Before we discuss any further, just go through this para to understand what Remote Desktop is. The Remote Desktop Connection enables users to connect and control other PCs or devices connected to the same local network. The feature is also available on computers connected to the internet or outside your network. It also enables remote access to a computer or server and allows control, including peripherals like the keyboard and mouse. After enabling remote desktop, you can use Windows’ client app ‘Remote Desktop Connection’ to connect to Windows PCs or Windows Servers via Remote Desktop Protocol.
It facilitates connecting machines that mutually support the RDS protocol. To connect two machines via RDP, you will need an RDP server and an RDP client. An RDP client is the computer to which you want to connect, and an RDP server is the computer or server to which you want to connect.
How To Enable Remote Desktop In Windows 11
Before you proceed to establish a remote connection, you must enable the remote desktop setting. Here we will discuss several methods to enable this feature. So, let’s begin.
Method 1: Enable Remote Desktop Through Settings
Enabling Remote Desktop via settings is one of the easiest ways. Follow the below-mentioned steps to enable it :–
Open Settings using Windows 11 (keyboard shortcut Win + 1)
Click on Systems on the left sidebar
Then, select Remote Desktop on the right pane
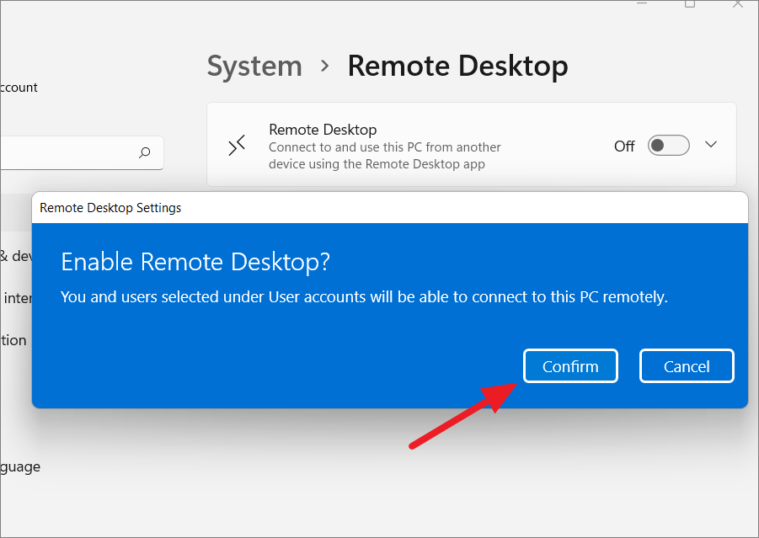
After that, turn on the Remote Desktop toggle
Next, click on Confirm to save the latest changes
Method 2: Enable Remote Desktop Through Control Panel
Open Control Panel on your Windows 11
Then, make sure you are using Category view in the Control Panel
After that, select System and Security
On the next page, tap on Allow remote access under System.
A pop-up window will appear with options to connect to a remote desktop
On the System, properties pop up window, select Allow remote connections to this computer
Finally, click on OK to save changes
Once you finish these steps, Remote Desktop will be enabled on your Windows 11, allowing you to access remote computers easily.
Method 3: Through Command Prompt
Open Start
Then open a Command Prompt window in Admin mode by searching for “cmd” in the Windows search option
Then select Run as Administrator
Now, copy and paste the below-written command in the Command Prompt window
[reg add “HKEY_LOCAL_MACHINE\SYSTEM\CurrentControlSet\Control\Terminal Server” /v fDenyTSConnections /t REG_DWORD /d 0 /f]- Then, click on Enter to enable Remote Desktop
- Although not required, you should ideally run the following command to allow remote desktop access through the Windows Firewall.
Method 4: Through PowerShell
Open Start
Then, search for PowerShell and tap Run as Administrator
Copy and paste the below-written command in the PowerShell window
[Set-ItemProperty -Path ‘HKLM:\System\CurrentControlSet\Control\Terminal Server’ -name “fDenyTSConnections” -value 0]Then, hit Enter
You can also ensure that the Windows Firewall does not interfere with your remote desktop connection. For that, copy and paste the following command
[Enable-NetFirewallRule -DisplayGroup “Remote Desktop”]- Next, press Enter to enable Remote Desktop
Conclusion
As you can see, enabling remote desktop in Windows 11 is a simple process once you know how to do it. So go ahead and enable the feature on your computer to assist friends and family with technical issues or to access important files and documents on your own computer while at work.
Experiencing difficulties with your Device, check out our “How To” page on how to resolve some of these issue