The Apple Watch Solo Loop bands have gained popularity for their sleek design and comfortable fit. These bands are made from a single strap of material with a stretchy design that allows them to be easily pulled on and off your wrist. However, finding the right size for your Solo Loop band is crucial to ensure a snug and secure fit. In this guide, we will walk you through the step-by-step process of measuring your wrist accurately for the Apple Watch Solo Loop bands.
Why Measuring Your Wrist is Important
Choosing the correct size for your Solo Loop band is essential for a comfortable and secure fit. A band that is too loose may slide around on your wrist and feel uncomfortable, while a band that is too tight can restrict circulation and cause discomfort. By accurately measuring your wrist, you can determine the size that will provide you with the best fit for your Apple Watch Solo Loop band.
Method 1: Using Apple’s Printable Tool
Apple provides a printable tool that can help you measure your wrist accurately. Follow these steps to use Apple’s printable tool:
- Visit Apple’s website and navigate to the page for Apple Watch or individual bands.
- Select the Solo Loop or Braided Solo Loop option under “Band Size.”
- Click on “Start your band measurement.”
- Download the printable tool provided by Apple.
- Make sure to print the page at 100% scale to ensure the correct size.
- Cut out the wrist sizing tool using a pair of scissors.
- Place the tool on your wrist where you would normally wear your watch face.
- Wrap the paper tool tightly around your wrist, ensuring it feels snug and doesn’t slide around.
- Take note of the number indicated by the arrows on the tool. If the arrows point to a line, choose the smaller of the two numbers closest to the line.
Method 2: Using a Tape Measure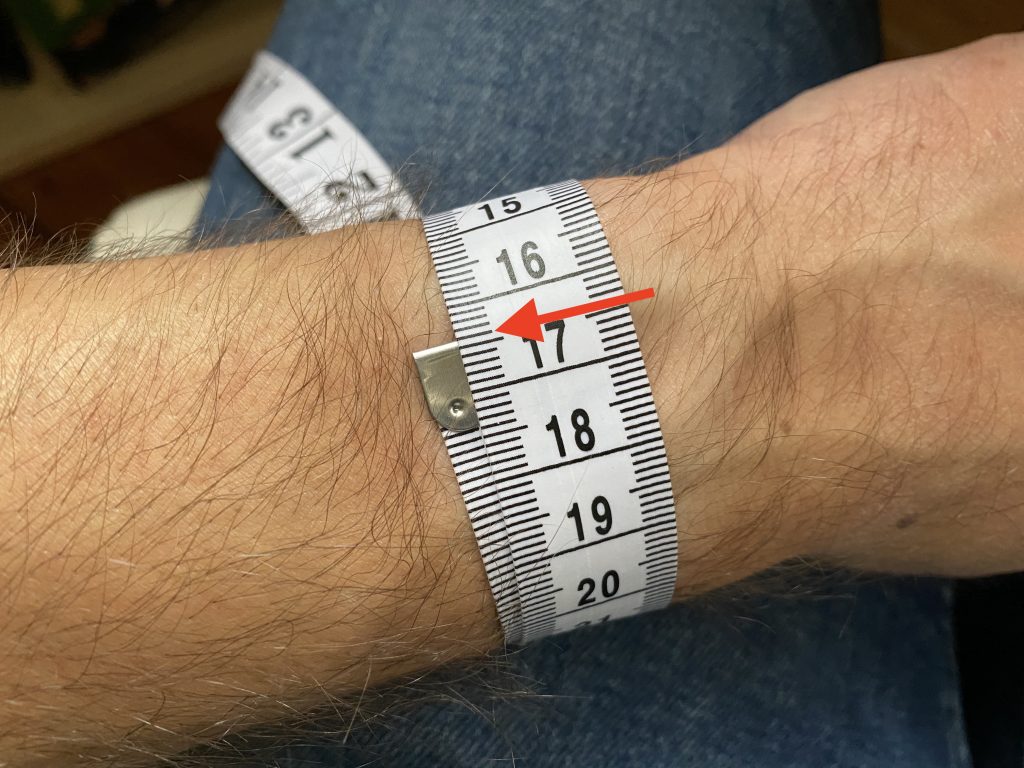
If you don’t have access to a printer, you can use a tape measure to measure your wrist. Follow these steps to measure your wrist accurately using a tape measure:
- Wrap a tape measure around your wrist, just below the wrist bone.
- Make sure the tape measure is snug but not too tight.
- Take note of the measurement in either inches or centimeters.
Method 3: Using a Ruler, Paper, and Pen
If you don’t have a tape measure, you can still measure your wrist accurately using a ruler, paper, and pen. Follow these steps:
- Cut a narrow strip of paper, approximately half an inch wide.
- Wrap the paper strip around your wrist, making sure it feels comfortable but not loose.
- Use a pen or pencil to mark the point where the end of the strip overlaps the other end.
- Lay the strip of paper on a flat surface and use a ruler to measure the distance between the end and the marked point.
- Take note of the exact measurement in either inches or centimeters.
Determining Your Band Size
Once you have measured your wrist using one of the above methods, you can determine the appropriate band size for your Apple Watch Solo Loop. Apple offers a range of sizes for the Solo Loop bands, and it’s important to select the right size to ensure a proper fit. Use the measurements you obtained from either the printable tool, tape measure, or ruler method to find the recommended band size.
Tips for Choosing the Right Size
When selecting your band size, there are a few tips to keep in mind to ensure the best fit:
- If your measurement falls between two sizes, Apple recommends choosing the smaller size for a snug fit.
- Consider the tightness you prefer for your watch band. Some people prefer a looser fit, while others prefer a tighter fit.
- Keep in mind that the Solo Loop bands are stretchable, so they can accommodate a range of wrist sizes.
Returning an Ill-Fitting Solo Loop Band
If you have measured your wrist accurately but find that the Solo Loop band you ordered doesn’t fit properly, Apple allows you to return the band without returning the entire watch. You can contact Apple and request a band swap. Apple’s online support staff cannot initiate this return process, so it’s best to call them directly. Once you have contacted Apple, you can send back the ill-fitting band, and a new one will be sent to you upon receipt of the old band.
Conclusion
Measuring your wrist accurately is crucial for finding the right size Apple Watch Solo Loop band. Whether you use Apple’s printable tool, a tape measure, or a ruler, the process is simple and ensures a comfortable and secure fit for your Apple Watch. By following the steps outlined in this guide, you can confidently select the correct size and enjoy the stylish and comfortable Solo Loop band on your Apple Watch.
Remember, the right fit is essential for optimal comfort and functionality. So, take the time to measure your wrist accurately and choose the perfect Apple Watch Solo Loop band size for you.
Experiencing difficulties with your Device, check out our “How To” page on how to resolve some of these issues.