If you’re an iPhone user, you’re probably familiar with the robust functionality and user-friendly interface that the iPhone brings to the table. One such feature is the ability to create and save slideshows using the Photos app. This feature is incredibly easy to use and can add a creative twist to your photo viewing experience. In this tutorial, we will guide you through the entire process of creating, customizing, and saving a slideshow on your iPhone.
Creating and Saving a Slideshow on iPhone
Creating a slideshow on your iPhone is a straightforward process that doesn’t require any special skills or technical knowledge. Here’s how you can do it:
- Open the Photos app on your iPhone and tap on the ‘Select’ option to choose the photos you want to include in your slideshow.
- Tap on the ‘Share’ icon, and then select ‘Slideshow’ from the list of options that appear on your screen.
- After you’ve done that, tap ‘Done’ and then tap on the ‘Share’ icon again.
- Scroll down until you see the ‘Save’ option. Tap on it to save the slideshow to your iPhone.
Customizing Your Slideshow on iPhone
Add a touch of creativity to your slideshow by customizing it. The iPhone’s Photos app provides several customization options like theme selection, music addition, and slide timing. Here’s how you can customize your slideshow:
- After selecting ‘Slideshow’ from the share options, tap on ‘Options’.
- Here, you will see various customization options like ‘Theme’, ‘Music’, ‘Repeat’, and ‘Speed’. Make your preferred selections and tap ‘Done’ to apply the changes.
Creating and Saving a Memories Slideshow
The Photos app on your iPhone automatically groups photos taken at certain locations or with certain people into ‘Memories’. You can create a slideshow using these ‘Memories’. Here’s how:
- Open the Photos app and tap on the ‘For You’ tab.
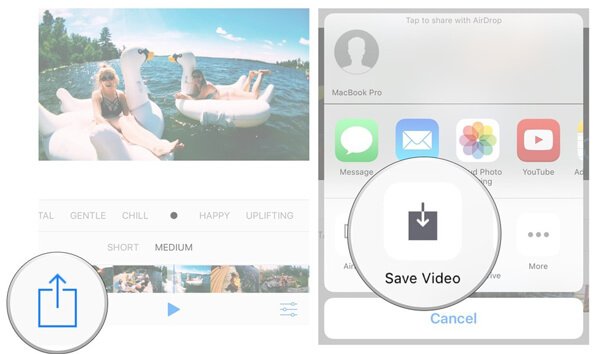
- Tap on your favorite Memory from the list of Memories and then tap on the ‘Share’ icon.
- From the list of options that appear, choose ‘Save Video’.
Customizing Your Memories Slideshow
Just like with regular slideshows, you can also customize Memories slideshows. Here are a few ways you can do that:
Change Memory Mix and Filter
-
- Tap on the Memory you want to edit and select the ‘Memory Mixes’ icon.
- Swipe to choose your preferred music for the slideshow and tap on the screen to apply the change.
- Tap on the ‘Filters’ icon to apply your favorite filter to the slideshow.
- Once you’ve made your edits, tap ‘Done’ to apply the changes.
Change Music
-
- Tap on the ‘Add Music’ icon and select your preferred music from the list.
- Tap ‘Done’ to apply the changes.
Change Memory Title
-
- Tap on the Memory you want to edit and select the three-dot menu at the top right corner of your screen.
- Choose ‘Edit Title’ and enter your preferred title for the slideshow.
- Tap ‘Save’ to apply the changes.
Change Memory Length
-
- Tap on the Memory you want to edit and select the three-dot menu.
- Choose either ‘Short’, ‘Medium’, or ‘Long’ depending on your preference.
- Once you’ve made your selection, the duration of your slideshow will be adjusted accordingly.
Add or Remove Photos from Your Memory Slideshow
-
- Tap on the Memory you want to edit and then tap on the screen.
- Select the three horizontal dots and tap on ‘Manage Photos’.
- Check the photos you want to include in your slideshow and uncheck the ones you want to exclude.
- Tap ‘Done’ to apply the changes.
Conclusion
Creating and saving a slideshow on your iPhone is a simple process that can make viewing your photos a lot more enjoyable. With just a few taps, you can create a slideshow, customize it to your liking, and save it directly to your iPhone. Now that you know how to do it, why not give it a shot?
Experiencing difficulties with your Device, check out our “How To” page on how to resolve some of these issues.