Having trouble with the keyboard backlight on your ASUS laptop? You’re not alone. Many users face issues where the keyboard doesn’t illuminate or they can’t control it’s configuration properly. In this comprehensive troubleshooting guide, we’ll explore common reasons behind ASUS keyboard backlight problems and provide you with ten effective fixes to resolve them. From checking dedicated hotkeys to performing a BIOS update, we’ve got you covered. So, let’s dive in and get your keyboard backlight shining again!
Check Dedicated Hotkeys
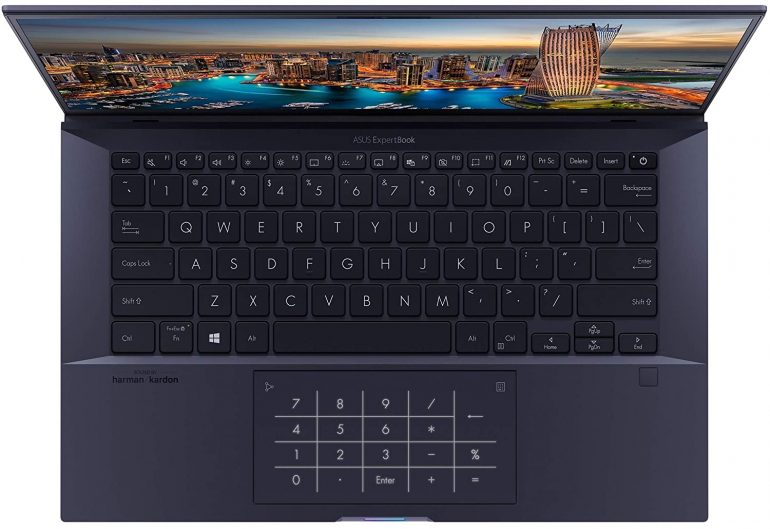
Most ASUS laptops have dedicated hotkeys to control the keyboard backlight. Press the F3 or F4 keys to adjust the brightness. If these keys don’t work, refer to your user manual to find the specific hotkeys for your model. In some cases, using the Fn key in combination with these dedicated hotkeys(e.g., Fn + F7, Fn + F3, Fn + F4) can solve the issue. Familiarize yourself with these hotkeys to ensure you’re not accidentally disabling the backlight.
Install the Latest ATK Driver
The ATK drivers are essential for supporting function keys and enabling proper keyboard functionality. Check if you have the ATK driver installed on your ASUS laptop. If not, you can download and install the latest ATK driver for your specific model from the official ASUS website. Ensure you follow the instructions in the setup wizard to complete the installation. The ATK driver provides the necessary support for controlling the keyboard backlight settings.
Perform EC Reset
If you’ve installed the latest ATK drivers but still face issues, performing an Embedded Controller(EC) reset might help. This hard reset can resolve temporary malfunctions with the keyboard backlight. To perform an EC reset, follow these steps:
- Close all running programs and shut down your ASUS laptop.
- Disconnect any external devices and remove the external battery if applicable.
- Press and hold the power button for 30 to 40 seconds to drain any residual power.
- Reinsert the battery and connect the power adapter.
- Start your ASUS laptop and check if the keyboard backlight is functioning properly. The EC reset restores the hardware to it’s default configuration and can often fix transient issues.
Run Dedicated Troubleshooters
Windows provides dedicated troubleshooters that can help identify and resolve keyboard backlight issues. Start with the Keyboard Troubleshooter, which can fix common driver and settings problems. To run the Keyboard Troubleshooter, follow these steps:
- Press Windows + I to open the Settings app.
- Go to the “System” section and choose “Troubleshoot”.
- Scroll down and click on “Other Troubleshooters”.
- Click on the “Keyboard” troubleshooter and select “Run”.
- The troubleshooter will diagnose any issues and attempt to fix them.
If the Keyboard Troubleshooter doesn’t resolve the problem, run the Hardware and Devices Troubleshooter. This utility scans the entire hardware components, including the keyboard backlight, for any potential issues and attempts to fix them.
To run the Hardware and Devices Troubleshooter, follow these steps:
- Press Windows + R to open the Run dialog box.
- Type “msdt.exe -id DeviceDiagnostic” and press Enter.
- The Hardware and Devices Troubleshooter will launch.
- Follow the on-screen instructions to diagnose and fix any hardware-related problems.
Update or Reinstall Troublesome Drivers
If the troubleshooters couldn’t identify the problem, consider updating or reinstalling the keyboard and system control interface drivers. Outdated or corrupted drivers can cause malfunctions with the keyboard backlight.
To update the keyboard drivers, follow these steps:
- Press Windows + X and choose “Device Manager”.
- Expand the “Keyboards” category.
- Right-click on your keyboard driver and select “Update driver”.
- Choose “Search automatically for drivers” and let Windows search for the latest drivers.
- If Windows doesn’t find any updates or the problem persists, check if there are updates available through the Windows Update settings.
If updating the drivers doesn’t help, you can try uninstalling and reinstalling the keyboard driver. To uninstall the keyboard driver, follow these steps:
- Right-click on your keyboard driver in the Device Manager.
- Select “Uninstall device” and confirm the uninstallation.
- Restart your ASUS laptop. Windows will automatically reinstall the necessary drivers upon reboot.
In addition to updating or reinstalling the keyboard drivers, also check for updates or reinstall the ASUS system control interface driver. This driver is responsible for controlling system behavior, including function keys and backlight control. Updating or reinstalling it can potentially fix any related bugs causing keyboard backlight problems.
Check Issues with Armoury Crate
If you own a ROG or TUF gaming laptop, the Armoury Crate utility can be a handy program for customizing keyboard lights and behavior. However, it can sometimes cause issues with the keyboard backlight.
To resolve problems related to Armoury Crate, follow these steps:
- Ensure that you have the latest version of the application installed. Check for updates on the official ASUS website or within the Armoury Crate application itself.
- If the software settings have been changed or someone you know has made modifications, revert the changes to their default configurations.
- If you suspect that the Armoury Crate application is infected with malware, run a thorough scan using reputable antivirus software. Alternatively, uninstall the application if you don’t use it or if it’s causing conflicts with the keyboard backlight.
Clean Boot to Find Issues
Sometimes, conflicts between third-party applications and services can interfere with the keyboard backlight functionality. By performing a clean boot, you can start your laptop with a minimal set of drivers and startup programs, helping you identify if any third-party software is causing the issue.
To perform a clean boot, follow these steps:
- Press Windows + R to open the Run dialog box.
- Type “msconfig” and press Enter to open the System Configuration utility.
- In the “Services” tab, check the box that says “Hide all Microsoft services”.
- Click on “Disable all” to disable non-Microsoft services.
- Switch to the “Startup” tab and click on “Open Task Manager”.
- Disable all the enabled startup applications to prevent them from running during system startup.
- Close the Task Manager and click on “OK” in the System Configuration utility.
- Restart your ASUS laptop and check if the keyboard backlight starts working properly.
If the keyboard backlight works after performing a clean boot, it indicates that a third-party application or service was causing the conflict. Enable each program or service one by one to identify the specific software causing the issue. Once identified, you can either keep it disabled or remove it from your ASUS laptop.
Reset Your ASUS BIOS
Misconfigured BIOS settings can sometimes affect the keyboard backlight. Enter your ASUS laptop’s BIOS and ensure that the keyboard backlight option is enabled. Although the options may vary depending on your laptop model, you can typically find them in the BIOS settings under the “Advanced” or “Power Management” sections. If you recall making any changes to the settings, try reverting them to their default configurations.
To reset your ASUS BIOS, follow these steps:
- Reboot your ASUS laptop and as soon as you see the ASUS logo, press the dedicated BIOS key(usually F2, but it may differ depending on your model).
- Once you’re in the UEFI interface, navigate to the “Exit” or “Advanced” tab.
- Look for options such as “Load Optimized Defaults” or “Restore Defaults”.
- Select the appropriate option and confirm the reset.
- Save and exit the BIOS settings. Your laptop will restart.
Update ASUS BIOS
Updating the BIOS can fix compatibility or bug-related issues that may be causing problems with the keyboard backlight. However, it’s important to exercise caution when updating the BIOS, as an incorrect update can lead to system instability.
To update your ASUS BIOS, follow these steps:
- Visit the official ASUS website and search for your laptop model.
- Navigate to the “BIOS & FIRMWARE” section under the “Driver & Utility” tab.
- Download the latest BIOS file for your model.
- Unzip the downloaded folder and copy the update file to a FAT32-formatted USB flash drive.
- Restart your ASUS laptop and enter the BIOS by pressing the dedicated BIOS key.
- Once in the BIOS, switch to Advanced Mode if available.
- Find the ASUS EZ Flash Utility or a similar option.
- Insert the USB flash drive containing the BIOS update file.
- Select the update file from the USB drive and follow the on-screen instructions to initiate the BIOS update.
- Allow the update process to complete. It may take several minutes.
- After the BIOS update is successful, your ASUS laptop will automatically restart. Check if the keyboard backlight is now working properly.
Remember to keep your laptop connected to a power source throughout the BIOS update process and ensure there are no interruptions or power failures.
Service Your ASUS Laptop
If none of the above solutions work, it’s possible that the issue lies with the hardware. In some cases, replacing the laptop battery can fix keyboard backlight issues. A faulty power supply could affect the backlight functionality.
If your ASUS laptop has a light sensor near the webcam, covering it may help if the sensor is malfunctioning. This could indicate a hardware fault that requires professional assistance.
If you’ve exhausted all the troubleshooting steps and the keyboard backlight still doesn’t work, it’s best to contact the nearest ASUS service center. Trained technicians can diagnose and repair any hardware-related problems, such as damaged backlight LEDs or malfunctioning components.
Conclusion
Keyboard backlight issues on ASUS laptops can be frustrating, but with this comprehensive troubleshooting guide, you have a range of solutions to try. From checking hotkeys and installing the latest drivers to performing an EC reset and updating the BIOS, we’ve covered the most effective fixes. If all else fails, it’s important to seek professional assistance. Remember to back up your data before attempting any major changes or updates. We hope these solutions help get your ASUS keyboard backlight shining brightly once again!
Experiencing difficulties with your Device, check out our “How To” page on how to resolve some of these issues.


