
In the dynamic world of digital storage, the emergence of duplicate files has become an omnipresent challenge for Mac users. The accumulation of identical data not only consumes precious storage space but also hampers system performance. To navigate through this maze of redundancy, this article presents three ultimate methods for finding and deleting duplicate files on your Mac.
From the user-friendly prowess of Macube Cleaner to harnessing the native intelligence of Smart Folder and delving into the advanced integration of Smart Folder with Terminal, we explore diverse approaches to streamline your Mac experience. Join us as we unravel these methods, offering insights and guidance to empower users in reclaiming their digital space and ensuring a more efficient and organized computing environment. Say farewell to duplication woes and embark on a journey towards a clutter-free Mac experience.
What Are the Common Duplicate Files on Mac?
On a Mac, common types of duplicate files can include:
Duplicate Documents:
Identical documents, such as text files, PDFs, spreadsheets, and presentations, that may be stored in different locations.
Duplicate Photos and Images:
Multiple copies of the same image or photo, often created unintentionally through imports, backups, or downloads.
Duplicate Music Files:
Repetition of audio files in your music library, possibly due to multiple imports or downloads.
Duplicate Videos:
Similar to duplicate photos, video files may also be duplicated when copied or downloaded multiple times.
Application Duplicates:
Sometimes, applications may be accidentally duplicated, especially if they are moved or copied between different folders.
Email Attachments:
Duplicate copies of email attachments can accumulate in various folders, especially if you frequently download or save attachments.
Backup Files:
Backups created manually or automatically may result in duplicate files if not managed properly.
Trash and Bin Duplicates:
Files that have been moved to the Trash or Bin but not permanently deleted can exist in duplicate if restored or copied back.
Disadvantages of Duplicate files:
The presence of duplicate files on a Mac can have several disadvantages:
- Wasted Storage Space: Duplicate files consume unnecessary storage space on your Mac, reducing the available capacity for more important files and applications.
- Performance Impact: A large number of duplicate files can contribute to slower system performance, especially if your storage is nearing its capacity limit.
- Confusion and Disorganization: Duplicate files can lead to confusion and disorganization in your file structure, making it harder to locate and manage important documents, photos, or other content.
- Backup Overheads: If you regularly back up your Mac, duplicate files will also contribute to increased backup sizes, potentially wasting backup storage space and increasing the time required for backup processes.
- Potential for Data Loss: If you’re not vigilant, you might delete important files mistakenly, thinking they are duplicates. This can lead to unintentional data loss.
- Slower Search and Indexing: Search processes and file indexing can be slower when there are numerous duplicate files to sift through, affecting the efficiency of search functionalities.
- Increased Vulnerability to Errors: Duplicate files may lead to errors or inconsistencies, especially if changes are made to one version of a file and not to the others.
- Complication of Software Updates: Duplicate files can complicate software updates, as unnecessary copies may need to be updated individually, consuming more time and potentially causing errors.
3 Ultimate Ways to Find/Delete Duplicates on Mac
Method 1: Find and Delete Duplicate Files on Mac with Macube
Macube Cleaner emerges as a dependable option, providing a seamless approach to Find/Delete Duplicates on Mac. Recognizing the significance of completely eliminating undesired applications and ensuring a clutter-free environment, Macube Cleaner places user satisfaction at the forefront. This tool empowers users to regain valuable disk space, maintain a neat Mac environment, and address common issues associated with residual app data.
Key Features:
Thorough Uninstallation Procedure:
Macube Cleaner goes beyond mere application removal, delving deep into your system to eliminate all associated files and caches, leaving your Mac genuinely clutter-free.
Malware Uninstallation for Enhanced Security:
A standout feature is its capability to combat malware. Macube Cleaner offers a secure method for uninstalling malware, fortifying your Mac’s defenses against potential threats.
Disk Space Optimization:
Macube efficiently manages unseen files that accumulate over time, ensuring optimized storage even beyond what’s visible, thereby preventing a sluggish Mac.
Expertise in Cookie Management:
Proficient in handling cookies, Macube ensures secure web browsing without compromising sensitive information, enhancing user experience while mitigating privacy risks.
Scanning Old and Duplicate Files:
Macube Cleaner enhances Mac efficiency by conducting thorough scans for old and duplicated files. Users can preview and choose to remove these files, ensuring a well-organized and optimized system.
Eliminating Unnecessary Junk Files:
Efficiently identifying and removing system logs, temporary files, and unnecessary applications, among other items, Macube contributes to overall system performance enhancement and liberates valuable disk space.
Use Smart Scan to Find and Delete Duplicate Files
Before we start you need to download and install Macube cleaner from the official website of Macube cleaner. You can also refer to Clearing duplicate files guide with Macube cleaner in three simple steps:
Step 1: Smart Scan
- Opt for Smart Scan to identify and locate unnecessary files scattered across your entire Mac.

Step 2: Preview
- Take a look at the scanning results and handpick the files you no longer need.
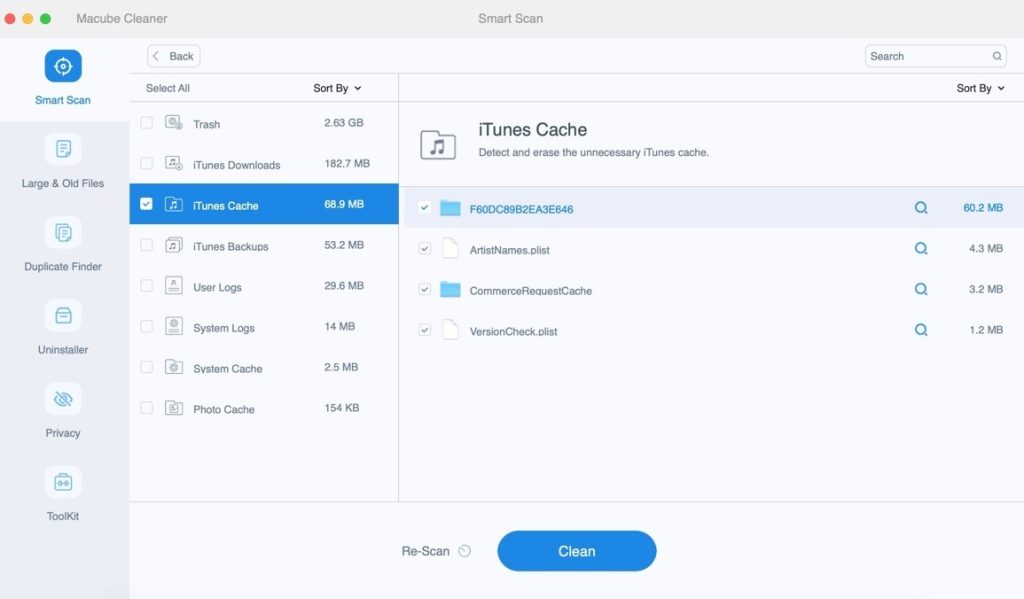
Step 3: Clean Up
- Clear out the identified junk files with a single click, and watch as your disk space gets reclaimed.

Pros and Cons:
Pros:
- Efficient and Thorough Uninstallation: Ensures no digital remnants are left behind.
- Performance Enhancement: Users report noticeable improvements in Mac speed and responsiveness.
- Security Boost: Acts as a shield against malware, enhancing overall system security.
- User-Friendly Interface: Simplifies complex processes for users of all technical levels.
- Free Trial Period: Allows users to explore features for 7 days before making a purchase commitment.
Cons:
- Requires Installation: Not suitable for users preferring manual removal processes.
Method 2: Find and Delete Duplicate Files on Mac with Smart Folder
Smart Folders on Mac offer a manual yet effective method for locating and removing duplicate files. These dynamic folders allow users to create customized searches based on specific criteria, streamlining the process of identifying duplicate files.
How to Use Smart Folders to Find and Delete Duplicate Files:
Step 01:
- Click on “File” in the top panel of your Mac.
- Select “New Smart Folder” to initiate the creation of a Smart Folder.

Step 02:
- Click the “+” sign to specify the type of files you want to display within the Smart Folder.
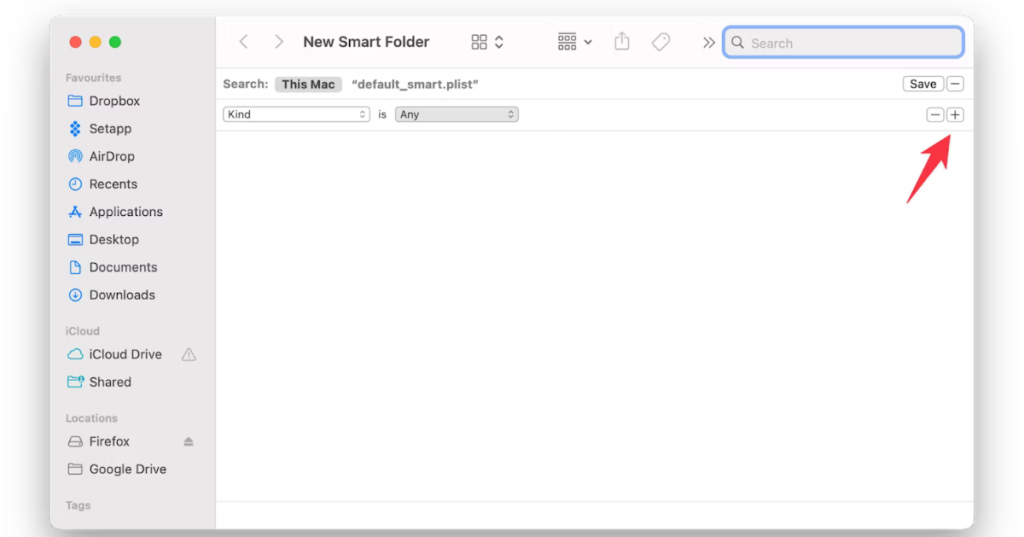
- Utilize the “+” button to add filters such as creation date, file name, etc., to refine the selection.

- Manually check each file for identical names, sizes, or other parameters, and delete unnecessary duplicates.
Pros and Cons:
Pros:
- Customization: Smart Folders offer flexibility in creating specific search criteria.
- Dynamic Updates: Smart Folders dynamically update based on the defined criteria, ensuring accurate results.
Cons:
- Time-Consuming: The manual checking process for duplicates can be time-intensive, especially for a large number of files.
- Limited Automation: Smart Folders, in their native state, lack automated features for swiftly identifying and deleting duplicate files.
Method 3: Find and Delete Duplicate Files on Mac with Smart Folder with Terminal
Terminal is a powerful tool on Mac that allows users to interact with their system through text commands. This guide will walk you through the process of finding and deleting duplicate files on your Mac using Terminal, providing step-by-step instructions along with visuals.
How to Use Terminal to Find and Delete Duplicate Files:
- Go to Finder.
- Choose Go > Utilities > Terminal.
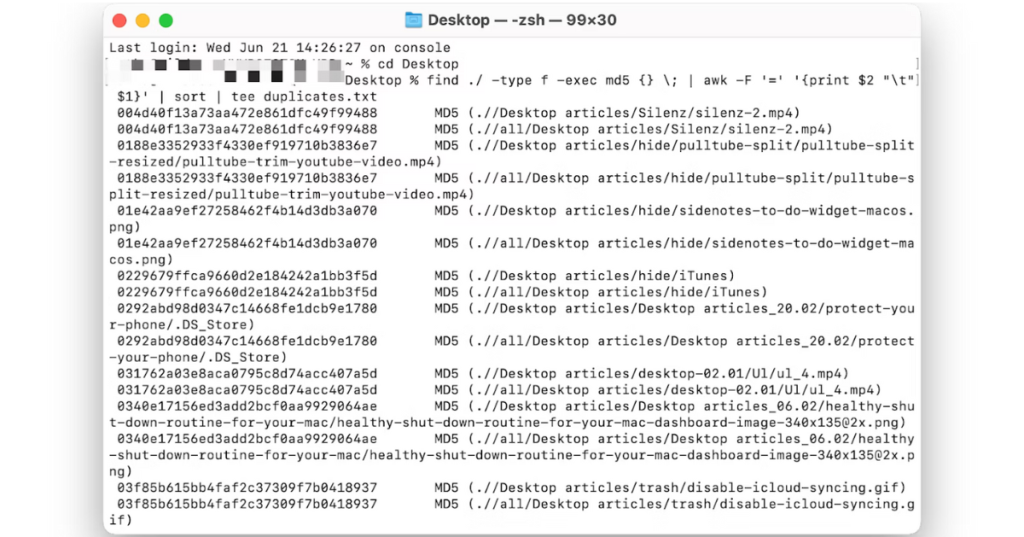
Step 01: Navigate to the Target Folder
- Use the “cd” command followed by the path to your desired folder. For example, to navigate to the Desktop, type: cd Desktop.
- Enter the following command: find ./ -type f -exec md5 {} \; | awk -F ‘=’ ‘{print $2 “\t” $1}’ | sort | tee duplicates.txt
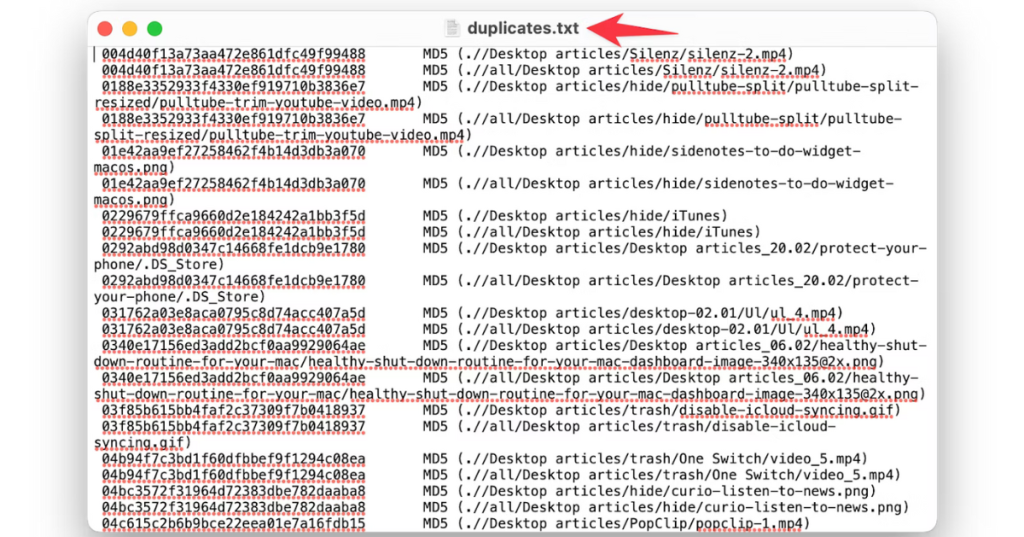
Step 02: Generate Duplicate List
- The command will create a list of identical files and save it as ‘duplicates.txt’ in the folder you scanned.
- Open ‘duplicates.txt’ to view the list of duplicate files.
- Decide which files to keep and which to delete. Use Spotlight to quickly locate files.
Pros and Cons:
Pros:
- Powerful and Customizable: Terminal provides a powerful and customizable way to find and manage files.
- Scripting Capabilities: Users can create scripts for automation and perform advanced tasks.
- Comprehensive Results: The command used provides detailed information, aiding in a thorough review of duplicate files.
Cons:
- Command Line Interface: Terminal relies on command line inputs, which might be intimidating for users unfamiliar with text-based interactions.
- Manual Decision Making: Identifying and deciding which files to delete requires manual effort and careful consideration.
- No Direct Deletion: Files cannot be deleted directly from Terminal, necessitating additional steps.
How to check that duplicate files have been completely deleted?
Here’s the easiest way to check that duplicate files have been completely deleted on a Mac, step by step:
- Spotlight Search: Open Spotlight by clicking on the magnifying glass icon in the top-right corner of the menu bar or by pressing Command + Spacebar.
- Search for Deleted File: Type the name of one of the duplicate files you deleted into the Spotlight search bar.
- Check Results: Review the search results to see if the file you searched for still appears. If it doesn’t show up in the results, it means the file has been successfully deleted.
- Repeat for Other Files (Optional): If you have specific duplicate files in mind, repeat the search process for each file to ensure they’ve all been deleted.
Conclusion:
In conclusion, tackling the challenge of duplicate files on Mac is paramount for maintaining an efficient and organized digital workspace. The three ultimate methods presented in this article cater to a spectrum of user preferences and technical expertise. Macube Cleaner emerges as a user-friendly solution, not only providing a seamless approach to uninstallation but also offering enhanced security against malware and efficient disk space optimization through its Smart Scan feature.
Smart Folders, while a manual method, empower users with customization options for specific search criteria, allowing them to sift through and delete duplicate files based on their preferences. However, it’s worth noting that this approach can be time-consuming, particularly for users dealing with a substantial number of files. For those comfortable with Terminal commands, the third method provides a powerful and customizable way to find and manage duplicate files, offering comprehensive results through detailed information.
Ultimately, by choosing the method that best suits their needs, Mac users can bid farewell to duplication woes, reclaim valuable disk space, and enjoy a more streamlined and efficient computing experience. Whether opting for user-friendly interfaces, manual customization, or leveraging the power of Terminal, these ultimate ways empower users to take control of their digital space on a Mac.


