Are you the proud owner of a new iPhone 13 and eager to start using it? Setting up a new phone can be overwhelming, especially when it comes to transferring all your data from your old device. Luckily, Apple has provided a convenient solution called Quick Start. In this guide, we will walk you through the process of setting up your iPhone 13 using Quick Start, as well as explore alternative methods of transferring your data.
Why Backing Up Your Old iPhone is Important
Before diving into the setup process, it is crucial to back up your old iPhone. This step ensures that your data is safely stored and can be easily transferred to your new device. Whether you choose to use Quick Start or another method, having a backup provides a safety net in case anything goes wrong during the setup process.
To back up your iPhone, you have multiple options. You can use iCloud, a Mac, or a PC. If you prefer to use iCloud, simply go to the Settings app on your iPhone and select the option to back up your device. For Mac users, connect your iPhone to your computer and use Finder (macOS Catalina or later) or iTunes (earlier versions) to initiate the backup. Windows users can also use iTunes to back up their devices.
Setting Up Your iPhone 13 Using Quick Start
Once you have a backup of your old iPhone, you are ready to begin the setup process for your iPhone 13. Quick Start streamlines the transfer of your data and settings from your old device to your new one. Follow these steps to get started:
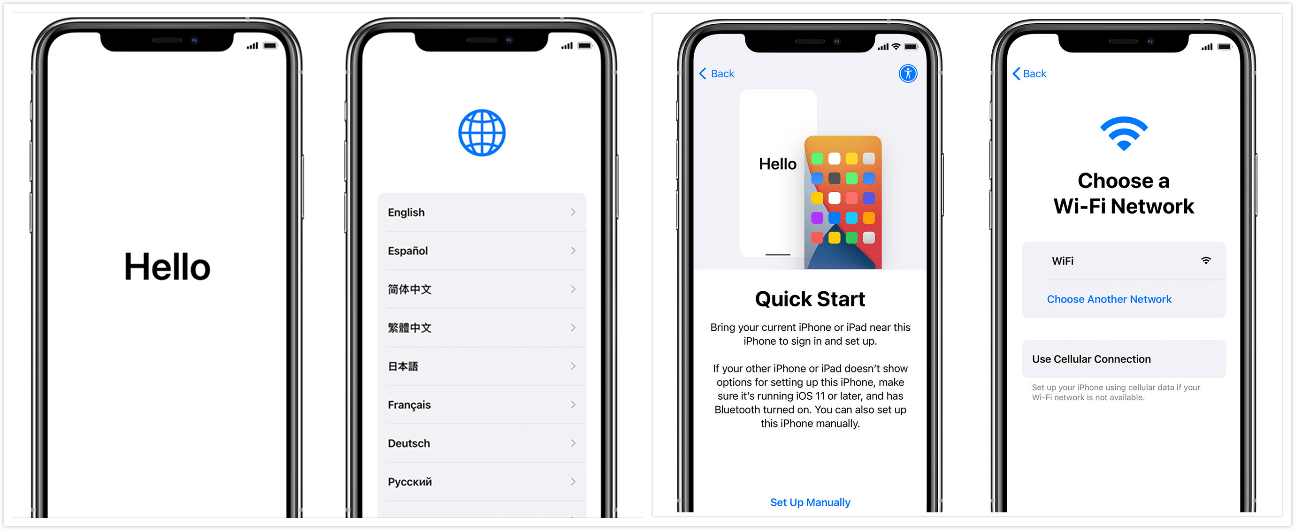
Select your language: On your new iPhone 13, swipe up from the Hello screen and select your preferred language.
Select your country: Choose your country or region from the list provided.
Activate Quick Start: The Quick Start option will appear on your screen. Bring your old iPhone close to your new device to initiate the transfer. If the option doesn’t appear, you can tap on “Set Up Manually” at the bottom of the screen.
Authenticate the transfer: An animated image will appear on your new iPhone’s screen. Align it with the circular window on your old iPhone to authenticate the transfer.
Enter your old iPhone’s passcode: You will be prompted to enter the passcode of your old iPhone onto your new device.
Tap Continue and agree to the terms: Follow the prompts on the screen, agree to Apple’s terms and conditions, and tap Continue.
Customize your settings: The Quick Start feature will display the data it is bringing over and provide an estimated time for the transfer. You can also customize your settings at this stage.
Transfer in progress: A progress bar will show you the estimated time remaining for the transfer to complete.
Once the transfer is complete, your new iPhone 13 will be ready to use with all your data and settings from your old device.
Alternative Methods for Transferring Data
While Quick Start is a convenient option for setting up your iPhone 13, there are alternative methods available for transferring your data. If Quick Start doesn’t suit your needs, you can opt to set up your new iPhone using an iCloud backup or a backup from your computer.
Setting Up with an iCloud Backup
To set up your iPhone 13 using an iCloud backup, follow these steps:
- Connect to Wi-Fi: During the setup process, choose the option to connect to a Wi-Fi network.
- Select Restore from an iCloud backup: On the Apps & Data screen, choose the option to restore from an iCloud backup.
- Sign in to iCloud: Enter your Apple ID and password to sign into iCloud.
- Choose a backup: Select the backup you want to restore from. It’s important to have previously backed up your old iPhone using iCloud.
- Follow the prompts: Continue following the onscreen prompts and wait for the process to complete.
Setting Up with a Backup from a Mac or PC
If you prefer to use a backup stored on your computer, here’s how to set up your iPhone 13:
- Connect your iPhone to your computer: Plug your new iPhone into one of your computer’s ports using the appropriate cable.
- Choose Set Up Manually: Follow the setup process until you reach the Apps & Data screen. Select the option to set up manually.
- Restore from Mac or PC: On your Mac or PC, open iTunes or Finder and select your new iPhone. Choose the option to restore from a backup and select the backup you want to use.
- Wait for the transfer: Allow the transfer process to complete, ensuring that your new iPhone has all your data from the backup.
Additional Tips and Tricks for Your iPhone 13
Now that your iPhone 13 is set up and ready to go, let’s explore some additional tips and tricks to enhance your experience:
Get familiar with iOS 15: Take the time to explore the latest features and improvements introduced with iOS 15, the operating system powering your iPhone 13.
Full-screen Caller ID: Learn how to enable full-screen Caller ID on iOS 15 to get a clearer view of who’s calling.
Activate the hidden trackpad: Discover a hidden feature that turns your iPhone’s keyboard into a trackpad for easier text editing.
By following these tips and tricks, you can make the most out of your new iPhone 13 and enjoy a seamless user experience.
Conclusion
In conclusion, setting up your iPhone 13 using Quick Start is a straightforward process that allows you to transfer your data and settings from your old device effortlessly. However, if Quick Start doesn’t suit your preferences, you have the option to set up your new iPhone using an iCloud backup or a backup from your computer. Whichever method you choose, ensure that you have a backup of your old iPhone to safeguard your data. With your new iPhone 13 up and running, take the time to explore the latest features and make the most out of your device.
Experiencing difficulties with your Device, check out our “How To” page on how to resolve some of these issues.