Mozilla Firefox is one of the popular and reliable web browsers available for Android. It consumes low memory and offers private browsing. This browser also provides added options like reading modes, download accelerators, themes, the ability to take screenshots in incognito mode, and many other cool features. If you have an Android phone and you have Mozilla Firefox installed on your phone and you want to know how to capture screenshots in incognito mode on Android, this article will be helpful for you.
Mozilla Firefox is a well-known browser, but still, it is not the most used browser. This browser started its journey in 1998 as Netscape Navigator, and in 2002 it began as Mozilla. Apart from the browser, Mozilla also offers other tools like Lockwise and Mozilla VPN. Lockwise is a password manager that works totally fine and offers great integration with the Firefox browser.
This browser offers a great private browsing option. Today, we will also see how a user can enable private browsing and take screenshots on an Android device while using Incognito mode.
Enabling Incognito Mode on Android
- Open the Browser and Go to Tabs.
- Now, Click on the Mask icon.
- Click the + Private Button
- Now, you have turned on the Private Browsing or Incognito Mode.
You need to keep in mind that your ISP will be able to track your activity even if you have turned on private browsing. Once you have turned on Private Browsing mode, you may want to surf the internet and read some articles or news. Maybe you will find something interesting on the internet and wanted to take a screenshot. However, Firefox won’t allow you to capture screenshots in Private Mode by default.
Enabling Screenshot in Mozilla Firefox Private Mode on Android Devices
Root access is needed for using ADB commands for bypassing the screenshot restrictions in applications like Netflix or Snapchat. However, you don’t need to face any such troubles while taking screenshots during Private mode/Incognito mode on Android devices. So, let’s see how you can capture screenshots while making use of private browsing mode in Mozilla Firefox on Android devices.
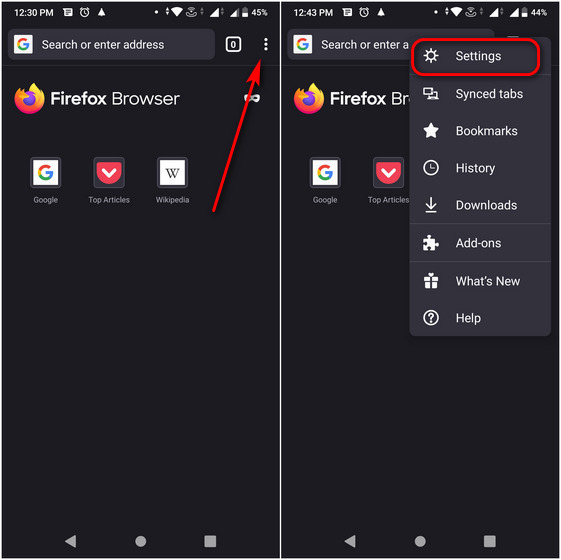
- To turn on screenshots in private mode, you will need to tap on the menu button. You will find the button at the top-right or bottom-right of the home screen. It depends on your configuration. Next, go to settings from the menu.

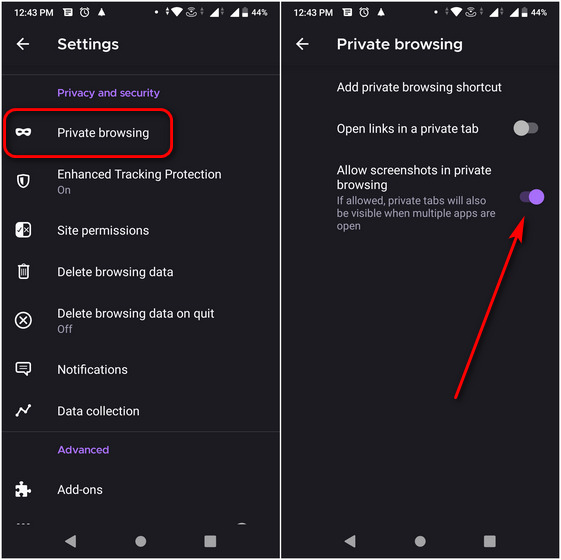
- When you are on the settings page, scroll down to select “Private Browsing.” You will find it under the Privacy and Security section. Then, you need to turn on the toggle to allow capturing screenshots in private browsing.

That’s simple! Now you can easily capture screenshots in incognito mode on Android. To disable screenshots, you need to follow the same steps and turn off the toggle.
This is a simple process to enable screenshots while using Firefox on Android in private browsing. You may experience confusion regarding the Firefox Lite version. Well, it is an extremely light version of the original browser for Android devices. However, you can easily turn on Incognito Mode by tapping on the mask icon available at the left. You can enable screenshots to capture screenshots in both private and normal browsing modes.
About Firefox for Android
Firefox for Android is a popular and rich browser that offers lots of features. It enables users to surf the internet freely without any silly bugs and issues. However, this browser offers its own Private Browsing mode. In addition, it provides synchronized tabs features, and you can install add-ons to the browser. This browser has a 4.4 out of 5 stars rating on PlayStore, and it has more than 100 million downloads.
Conclusion
Private Browsing is a great feature to browse the internet without leaving any traces regarding usage on the browser. It is always ideal to use VPN while browsing to hide all of your internet browsing histories. However, the only connections that they will be able to trace is that you are using some VPN service, and that’s it. Even if you have all of these features enabled, you still need to be watchful and browse the internet sensibly.
Experiencing difficulties with your Device, check out our “How To” page on how to resolve some of these issues.


