Apple sets the audio messages received on iPhones to delete automatically after 2 minutes after they are played. However, at times we may want to keep that audio message to hear it again at a later time. There are different ways in which you can save these audio messages. Listed below are methods that will help you keep these audio messages.
Method 1
If you are using a recent iPhone and wish to learn how to save audio message on iPhone iOS 13 then follow the steps below.
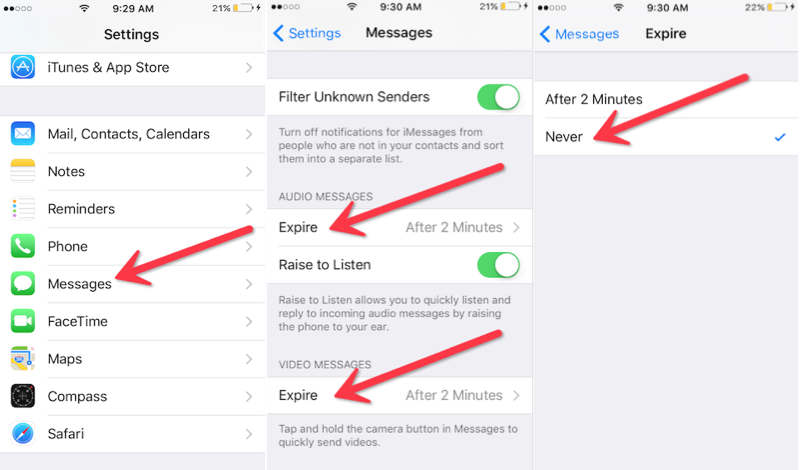
- Go to Settings
- Tap on Messages app
- Look for Audio Messages and under it tap on Expire
- Next tap on Never
This will prevent the audio messages from being deleted from your iPhone. The same steps work for all iPhones that use iOS 8 and above.
Earlier iPhone users had the option to Save these audio messages as voice memos. The Save option was present only till iOS 11. The later operating systems i.e. iOS 12 and up do not have the Save option. However, users can send the audio messages to their email if their audio messages are not saving to voice memos.
Go to Messages and tap to open the conversation that has the audio message you wish to save
Long press the audio message to get a pop-up
From the Menu that you get tap on More
Tap on the arrow icon located in the bottom right side of the phone
Tap on Mail
A pop-up window will open that will allow you to compose an email
Enter the email address and other details as you would while composing an email
Click on Send (the arrow located on the upper right side of the compose page)
You will now have the audio message saved in your email as an attachment that can be downloaded and heard again later.

Method 2
Another way that lets you save audio messages is by saving them to your computer using third-party software. Many consider this method to be safer than the first option. This also lets you save selected audio messages to your computer. There are several third-party software available that do the job you can pick any one – iMyFone D-Back and Joyoshare are two such software that you can use. We will show you the steps for iFone D-Back in this article.
Download and install the software on your computer
Open the program and tap on Recover from iOS Device
In the next window click on Message as the audios were received as a message attachment.
Next you will be prompted to connect your iPhone to the computer with a USB cable.
When the device is detected, click on Next and the iMyFone program will begin scanning the data on your iPhone
When the scan is complete, the messages on the device along with their attachments will be displayed in a window. If at all you are unable to locate the audio files in Message or Message Attachment tab, you should look them up in the Voice Memo. Once done click on Recover and save them to your computer
The method to save audio messages on your computer using different software would also be similar. You must follow the instructions as prompted to complete the steps.
Use these steps to save the audio messages received on your iPhone.


